1.4Android应用之电话拔号器-创新互联
实验目的

1.掌握简单的组件(TextView,EditText,Button)使用
2.掌握点击事件的使用
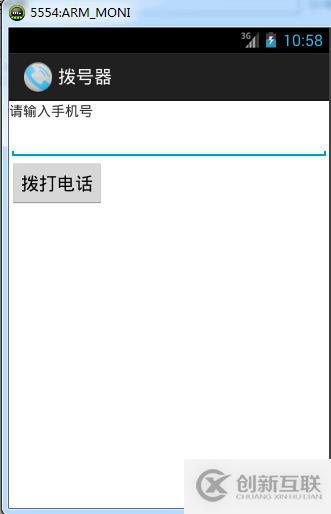
电话拔号器效果图
界面布局代码:
<RelativeLayout xmlns:android="http://schemas.android.com/apk/res/android"
    xmlns:tools="http://schemas.android.com/tools"
    android:layout_width="match_parent"
    android:layout_height="match_parent" >
  <TextView
      android:id="@+id/title"
      android:layout_width="wrap_content"
      android:layout_height="wrap_content"
      android:text="@string/title"/>

  <EditText
      android:id="@+id/phoneNumber"
      android:layout_width="match_parent"
      android:layout_height="wrap_content"
      android:inputType="phone"
      android:layout_below="@id/title"/>

  <Button
      android:id="@+id/button"
      android:layout_width="wrap_content"
      android:layout_height="wrap_content"
      android:text="@string/callPhone"
      android:layout_below="@id/phoneNumber"/>
</RelativeLayout>
Java代码实现拨打电话:
 @Override
    protected void onCreate(Bundle savedInstanceState) {
        super.onCreate(savedInstanceState);
        setContentView(R.layout.main);

        Button  button=(Button) findViewById(R.id.button);
        button.setOnClickListener(this);
    }
    @Override
    public void onClick(View v) {
       //1.获取输入的电话号码
        EditText et=(EditText) findViewById(R.id.phoneNumber);
        String number=et.getText().toString();
       //2.创建打电话意图
        Intent intent=new Intent();
        intent.setAction(intent.ACTION_CALL);
        intent.setData(Uri.parse("tel:"+number));
        startActivity(intent);
    }
注意 在AndroidManifest.xml添加拨打电话的权限
<uses-permission android:name="android.permission.CALL_PHONE"/>
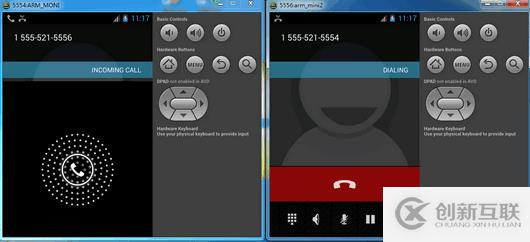
测试:
另外有需要云服务器可以了解下创新互联scvps.cn,海内外云服务器15元起步,三天无理由+7*72小时售后在线,公司持有idc许可证,提供“云服务器、裸金属服务器、高防服务器、香港服务器、美国服务器、虚拟主机、免备案服务器”等云主机租用服务以及企业上云的综合解决方案,具有“安全稳定、简单易用、服务可用性高、性价比高”等特点与优势,专为企业上云打造定制,能够满足用户丰富、多元化的应用场景需求。
分享名称:1.4Android应用之电话拔号器-创新互联
URL链接:https://www.cdcxhl.com/article0/dscgio.html
成都网站建设公司_创新互联,为您提供域名注册、标签优化、企业网站制作、品牌网站设计、App设计、网站制作
声明:本网站发布的内容(图片、视频和文字)以用户投稿、用户转载内容为主,如果涉及侵权请尽快告知,我们将会在第一时间删除。文章观点不代表本网站立场,如需处理请联系客服。电话:028-86922220;邮箱:631063699@qq.com。内容未经允许不得转载,或转载时需注明来源: 创新互联

- 为什么企业更愿意做响应式网站? 2022-12-10
- 建设响应式网站建设的流程有哪些? 2022-12-16
- 响应式网站建设相比传统网站形式有哪些好处 2016-04-25
- 企业做好移动互联网营销 响应式网站建设不可或缺 2016-05-05
- 如何为响应式网站建设引流百万转化率? 2021-04-30
- 响应式网站建设具备哪些优势和好处? 2022-05-23
- 企业建设响应式网站有哪些优势? 2016-09-15
- 浅谈响应式网站制作的几种布局类型 2021-10-09
- 响应式网站有什么样的特点? 2014-09-07
- H5响应式网站到底有什么优势? 2021-06-08
- 响应式网站制作给企业带来的好处 2023-03-20
- 响应式网站设计的8大SEO优势 2019-04-12