Nginx连接超时怎么办,进程管理优化助您化解-创新互联
下文给大家带来Nginx连接超时怎么办,进程管理优化助您化解,希望能够给大家在实际运用中带来一定的帮助,负载均衡涉及的东西比较多,理论也不多,网上有很多书籍,今天我们就用创新互联在行业内累计的经验来做一个解答。

Nginx之连接超时
在企业网站中,为了避免同一个客户长时间占用连接,造成资源浪费
可设置相应的连接超时参数,实现控制连接访问时间
配置nginx
[root@localhost ~]# yum install pcre-devel zlib-devel gcc gcc-c++ -y ##安装环境包

[root@localhost ~]# useradd -M -s /sbin/nologin nginx  ##创建程序性用户

[root@localhost ~]# mkdir /chen  ##创建挂载点
[root@localhost ~]# mount.cifs //192.168.100.23/LNMP /chen  ##挂载
Password for root@//192.168.100.23/LNMP:

[root@localhost chen]# tar zxvf nginx-1.12.2.tar.gz -C /opt/  ##解压

[root@localhost chen]# cd /opt/
[root@localhost opt]# ls
nginx-1.12.2  rh
[root@localhost opt]# cd nginx-1.12.2/
[root@localhost nginx-1.12.2]# ls
auto   CHANGES.ru  configure  html   man   src
CHANGES  conf     contrib   LICENSE  README

./configure \  ##安装nginx组件
--prefix=/usr/local/nginx \
--user=nginx \
--group=nginx \
--with-http_stub_status_module

[root@localhost nginx-1.12.2]# make && make install ##编译

[root@localhost nginx-1.12.2]# ln -s /usr/local/nginx/sbin/nginx /usr/local/sbin/ ##做软链接让系统能识别nginx的所有人命令
[root@localhost nginx-1.12.2]# nginx -t  ##检查语法错误
nginx: the configuration file /usr/local/nginx/conf/nginx.conf syntax is ok
nginx: configuration file /usr/local/nginx/conf/nginx.conf test is successful
写nginx脚本放在系统启动脚本中方便service管理器管理
[root@localhost nginx-1.12.2]# cd /etc/init.d/ ##到系统启动脚本

[root@localhost init.d]# vim nginx  ##写一个nginx脚本

#!/bin/bash
#chkconfig: - 99 20  #注释信息
#description: Nginx Service Control Script
PROG="/usr/local/nginx/sbin/nginx"  #这个变量,指向我的命令文件
PIDF="/usr/local/nginx/logs/nginx.pid"  #这个变量,指向nginx的进程号
case "$1" in
   start)
     $PROG
     ;;
   stop)
     kill -s QUIT $(cat $PIDF)
     ;;
   restart)
     $0 stop
     $0 start
     ;;
   reload)
     kill -s HUP $(cat $PIDF)
     ;;
   *)
         echo "Usage: $0 {start|stop|restart|reload}"
         exit 1
esac
exit 0

[root@localhost init.d]# chmod +x nginx  ##给Nginx提升权限
[root@localhost init.d]# chkconfig --add nginx  ##添加nginx
[root@localhost init.d]# service nginx start
[root@localhost init.d]# netstat -ntap | grep nginx
tcp     0    0 0.0.0.0:80        0.0.0.0:*        LISTEN    17544/nginx: master

[root@localhost init.d]# systemctl stop firewalld.service
[root@localhost init.d]# setenforce 0
配置连接超时
修改nginx配置文件
[root@localhost ~]# cd /usr/local/nginx/conf/
[root@localhost conf]# vim nginx.conf
在http协议级别区域中添加
31   keepalive_timeout  65 180; ##65是云服务器超时时间,180是客户端超时时间
 32   client_header_timeout 80;  ##80是网页中的头部超时时间
 33   client_body_timeout 80;  ##80是网页中身体的超时时间
[root@localhost conf]# service nginx stop
[root@localhost conf]# service nginx start
nginx进程管理优化
查看进程
[root@localhost conf]# ps aux | grep nginx
root    51524  0.0  0.0  20544  600 ?     Ss  20:05  0:00 nginx: master process /usr/local/nginx/sbin/nginx
nginx   51525  0.0  0.0  23072  1388 ?     S   20:05  0:00 nginx: worker process
root    51531  0.0  0.0 112728  972 pts/3   S+  20:06  0:00 grep --color=auto nginx
master只是起到一个监督的作用,不会去处理请求
worker才是工作进程,处理请求
这边我们只有一工作进程,所有的请求都会交给它
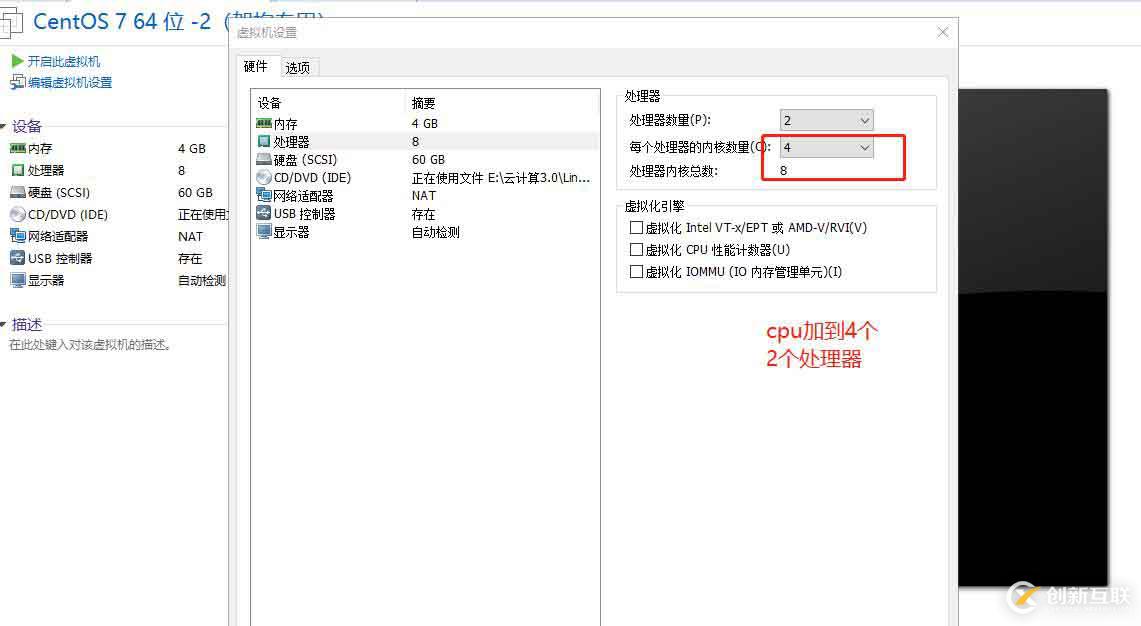
如果我们想优化就要去扩展,我们在虚拟机中,直接扩展如果我们这个nginx是在阿里云上面,即可以手动扩,也可以自动扩,自动扩就要写一个自动编排的工具,我们需要触发到比如CPU不足,这个时候就需要zbbix监控。
cpu 内存 硬盘 网络带宽 这些叫做垂直扩展
服务器实例的数量 叫做水平扩展
[root@localhost conf]# init 0 ##关闭服务器才能扩展

回到服务器中修改配置文件
[root@localhost ~]# cd /proc/ ##查看你的cpu,内存信息
[root@localhost proc]# ls
1   1536  1790  305  40  526  626  717     devices    mtrr
10   1542  18   306  41  53  628  72     diskstats   net
100  1545  189  307  416  54  63  723     dma      pagetypeinfo
1082  1557  19   31  417  55  630  724     driver    partitions
1084  1562  2   319  418  558  651  73     execdomains  sched_debug
1085  1565  20   32  42  560  652  732     fb      schedstat
1089  1581  21   320  43  575  654  733     filesystems  scsi
1096  1594  22   33  433  576  666  74     fs      self
11   16   23   333  44  577  667  75     interrupts  slabinfo
1106  1613  24   334  443  578  668  76     iomem     softirqs
1107  1629  25   335  45  579  669  763     ioports    stat
12   1633  26   336  450  580  671  77     irq      swaps
1228  1637  27   337  451  581  674  78     kallsyms   sys
126  1640  28   338  456  582  675  79     kcore     sysrq-trigger
13   1648  288  339  47  583  679  8      keys     sysvipc
131  1651  289  34  48  584  685  80     key-users   timer_list
1335  1660  29   340  486  585  686  888     kmsg     timer_stats
1337  1668  290  341  49  586  687  9      kpagecount  tty
1338  1680  298  342  5   587  690  99     kpageflags  uptime
136  1687  299  343  50  588  697  acpi    loadavg    version
14   1689  3   35  51  589  698  buddyinfo  locks     vmallocinfo
1438  1696  30   36  516  590  7   bus     mdstat    vmstat
1449  17   300  360  52  593  700  cgroups   meminfo    zoneinfo
1478  1739  301  37  522  6   701  cmdline   misc
1479  1741  302  38  523  60  703  consoles  modules
15   1749  303  39  524  61  71  cpuinfo   mounts
1532  1768  304  4   525  62  716  crypto   mpt
[root@localhost proc]# cat cpuinfo ##查看CPU,有8个核心数
processor : 7
vendor_id : GenuineIntel
cpu family : 6
model : 94
model name : Intel(R) Core(TM) i7-6700HQ CPU @ 2.60GHz
stepping : 3
microcode : 0xcc
cpu MHz : 2591.567
cache size : 6144 KB
physical id : 1
siblings : 4
core id : 3
cpu cores : 4
apicid : 7
initial apicid : 7
fpu : yes
fpu_exception : yes
cpuid level : 22
wp : yes修改nginx配置文件
[root@localhost proc]# cd /usr/local/nginx/conf/
[root@localhost conf]# vim nginx.conf
 3 worker_processes  8;  ##第三行修改原来只有一个核心数,现在我们改成8个
每个核心数默认处理1024个请求
让所有的请求分摊给这8个核心数去处理,做负载均衡
4 worker_cpu_affinity 01 10 [root@localhost conf]# service nginx stop [root@localhost conf]# service nginx start [root@localhost conf]# ps aux | grep nginx ##查看进程 root 1951 0.0 0.0 20544 660 ? Ss 23:24 0:00 nginx: master process /usr/local/nginx/sbin/nginx nginx 1952 0.0 0.0 23072 1396 ? S 23:24 0:00 nginx: worker process nginx 1953 0.0 0.0 23072 1384 ? S 23:24 0:00 nginx: worker process nginx 1954 0.0 0.0 23072 1388 ? S 23:24 0:00 nginx: worker process nginx 1955 0.0 0.0 23072 1396 ? S 23:24 0:00 nginx: worker process nginx 1956 0.0 0.0 23072 1388 ? S 23:24 0:00 nginx: worker process nginx 1957 0.0 0.0 23072 1396 ? S 23:24 0:00 nginx: worker process nginx 1958 0.0 0.0 23072 1396 ? S 23:24 0:00 nginx: worker process nginx 1959 0.0 0.0 23072 1396 ? S 23:24 0:00 nginx: worker process
root 1984 0.0 0.0 112728 972 pts/0 S+ 23:25 0:00 grep --color=auto nginx
看了以上关于Nginx连接超时怎么办,进程管理优化助您化解,如果大家还有什么地方需要了解的可以在创新互联行业资讯里查找自己感兴趣的或者找我们的专业技术工程师解答的,创新互联技术工程师在行业内拥有十几年的经验了。
另外有需要云服务器可以了解下创新互联cdcxhl.cn,海内外云服务器15元起步,三天无理由+7*72小时售后在线,公司持有idc许可证,提供“云服务器、裸金属服务器、高防服务器、香港服务器、美国服务器、虚拟主机、免备案服务器”等云主机租用服务以及企业上云的综合解决方案,具有“安全稳定、简单易用、服务可用性高、性价比高”等特点与优势,专为企业上云打造定制,能够满足用户丰富、多元化的应用场景需求。
网站题目:Nginx连接超时怎么办,进程管理优化助您化解-创新互联
本文路径:https://www.cdcxhl.com/article6/jopig.html
成都网站建设公司_创新互联,为您提供品牌网站制作、服务器托管、ChatGPT、用户体验、App设计、品牌网站设计
声明:本网站发布的内容(图片、视频和文字)以用户投稿、用户转载内容为主,如果涉及侵权请尽快告知,我们将会在第一时间删除。文章观点不代表本网站立场,如需处理请联系客服。电话:028-86922220;邮箱:631063699@qq.com。内容未经允许不得转载,或转载时需注明来源: 创新互联

- 深圳SEO优化:如何做好网站的搜索引擎优化 2020-10-30
- 搜索引擎优化高手技巧链接 2020-03-31
- 枣庄SEO做搜索引擎优化首先看到的是要害词排名,其次是网站内容 2023-02-01
- 搜索引擎优化的状态和焦点 2015-01-02
- 搜索引擎优化网站建设选项 2016-11-01
- 济南网站优化【图片外链】分解图片外链对搜索引擎优化的浸染 2023-01-04
- 菏泽竞价托管熟知网站框架搭建与站点搜索引擎优化常识是企业对外推广的必备技术 2023-01-11
- 怎样剖析网站搜索引擎优化作用? 2023-04-12
- 搜索引擎优化(SEO)的另类解释 2022-09-15
- 怎么建设一个符合搜索引擎优化的网站? 2016-11-09
- 动态页面会对网站搜索引擎优化产生什么影响? 2021-09-25
- 基于Flash的网站的搜索引擎优化技巧 2016-11-16
