java设计模式-创新互联
- 第 1 章 内容介绍
- 设计模式的目的
- 第 2 章 设计模式七大原则
- 2.1 设计模式的目的
- 2.2 设计模式七大原则
- 2.3 单一职责原则
- 2.3.1基本介绍
- 2.3.2应用实例
- 2.3.3单一职责原则注意事项和细节
- 2.4 接口隔离原则(Interface Segregation Principle)
- 2.4.1基本介绍
- 2.4.2应用实例
- 2.4.3应传统方法的问题和使用接口隔离原则改进
- 2.5 依赖倒转原则
- 2.5.1基本介绍
- 2.5.2应用实例
- 2.5.3依赖关系传递的三种方式和应用案例
- 2.5.4依赖倒转原则的注意事项和细节
- 2.6 里氏替换原则
- 2.6.1OO 中的继承性的思考和说明
- 2.6.2基本介绍
- 2.6.3一个程序引出的问题和思考
- 2.6.4解决方法
- 2.7 开闭原则
- 2.7.1基本介绍
- 2.7.2看下面一段代码
- 2.7.3方式 1 的优缺点
- 2.7.4改进的思路分析
- 2.8 迪米特法则
- 2.8.1基本介绍
- 2.8.2应用实例
- 2.8.3应用实例改进
- 2.8.4迪米特法则注意事项和细节
- 2.9 合成复用原则(Composite Reuse Principle)
- 2.9.1基本介绍
- 2.10 设计原则核心思想
- 第 3 章UML 类图
- 3.1 UML 基本介绍
- 3.2 UML 图
- 3.3 UML 类图
- 3.4 类图—依赖关系(Dependence)
- 3.5 类图—泛化关系(generalization)
- 3.6 类图—实现关系(Implementation)
- 3.7 类图—关联关系(Association)
- 3.8 类图—聚合关系(Aggregation)
- 3.8.1基本介绍
- 3.8.2应用实例
- 3.9 类图—组合关系(Composition)
- 3.9.1基本介绍
- 3.9.2应用案例
- 第 4 章设计模式概述
- 4.1 掌握设计模式的层次
- 4.2 设计模式介绍
- 4.3 设计模式类型
- 第 5 章单例设计模式
- 5.1 单例设计模式介绍
- 5.2 单例设计模式八种方式
- 5.3 饿汉式(静态常量)
- 5.4 饿汉式(静态代码块)
- 5.5 懒汉式(线程不安全)
- 5.6 懒汉式(线程安全,同步方法)
- 5.7 懒汉式(线程安全,同步代码块)
- 5.8 双重检查
- 5.10 枚举
- 5.11 单例模式在 JDK 应用的源码分析
- 5.11.1 单例模式在 JDK 应用的源码分析
- 5.12 单例模式注意事项和细节说明

编写软件过程中,程序员面临着来自 耦合性,内聚性以及可维护性,可扩展性,重用性,灵活性等多方面的挑战,设计模式是为了让程序(软件),具有更好
- 代码重用性 (即:相同功能的代码,不用多次编写)
- 可读性 (即:编程规范性, 便于其他程序员的阅读和理解)
- 可扩展性 (即:当需要增加新的功能时,非常的方便,称为可维护)
- 可靠性 (即:当我们增加新的功能后,对原来的功能没有影响)
- 使程序呈现高内聚,低耦合的特性
编写软件过程中,程序员面临着来自 耦合性,内聚性以及可维护性,可扩展性,重用性,灵活性等多方面的挑战,设计模式是为了让程序(软件),具有更好
- 代码重用性 (即:相同功能的代码,不用多次编写)
- 可读性 (即:编程规范性, 便于其他程序员的阅读和理解)
- 可扩展性 (即:当需要增加新的功能时,非常的方便,称为可维护)
- 可靠性 (即:当我们增加新的功能后,对原来的功能没有影响)
- 使程序呈现高内聚,低耦合的特性
设计模式原则,其实就是程序员在编程时,应当遵守的原则,也是各种设计模式的基础(即:设计模式为什么这样设计的依据)
** 设计模式常用的七大原则有:**
- 单一职责原则
- 接口隔离原则
- 依赖倒转(倒置)原则
- 里氏替换原则
- 开闭原则
- 迪米特法则
- 合成复用原则
对类来说的,即一个类应该只负责一项职责。如类 A 负责两个不同职责:职责 1,职责2。当职责1 需求变更而改变 A 时,可能造成职责 2 执行错误,所以需要将类 A 的粒度分解为 A1,A2
2.3.2应用实例以交通工具案例`
- 方案 1
public class SingleResponsibility1 {public static void main(String[] args) {Vehicle vehicle = new Vehicle();
            vehicle.run("摩托车");
            vehicle.run("汽车");
            vehicle.run("飞机");
        }
    }

       // 交通工具类
// 方式 1
// 1. 在方式 1 的 run 方法中,违反了单一职责原则
// 2. 解决的方案非常的简单,根据交通工具运行方法不同,分解成不同类即可
        class Vehicle {public void run(String vehicle) {System.out.println(vehicle + " 在公路上运行....");
            }
}- 方案 2
public class SingleResponsibility2 {public static void main(String[] args) {RoadVehicle roadVehicle = new RoadVehicle();
        roadVehicle.run("摩托车");
        roadVehicle.run("汽车");
        AirVehicle airVehicle = new AirVehicle();
        airVehicle.run("飞机");
    }
}

//方案 2 的分析
//1. 遵守单一职责原则
//2. 但是这样做的改动很大,即将类分解,同时修改客户端
//3. 改进:直接修改 Vehicle 类,改动的代码会比较少=>方案 3
class RoadVehicle {public void run(String vehicle) {System.out.println(vehicle + "公路运行");
    }
}

class AirVehicle {public void run(String vehicle) {System.out.println(vehicle + "天空运行");
    }
}

class WaterVehicle {public void run(String vehicle) {System.out.println(vehicle + "水中运行");
    }
}- 方案 3
package com.atguigu.principle.singleresponsibility;

public class SingleResponsibility3 {public static void main(String[] args) {		Vehicle2 vehicle2  = new Vehicle2();
		vehicle2.run("汽车");
		vehicle2.runWater("轮船");
		vehicle2.runAir("飞机");
	}

}


//方式3的分析
//1. 这种修改方法没有对原来的类做大的修改,只是增加方法
//2. 这里虽然没有在类这个级别上遵守单一职责原则,但是在方法级别上,仍然是遵守单一职责
class Vehicle2 {public void run(String vehicle) {//处理

		System.out.println(vehicle + " 在公路上运行....");

	}

	public void runAir(String vehicle) {System.out.println(vehicle + " 在天空上运行....");
	}

	public void runWater(String vehicle) {System.out.println(vehicle + " 在水中行....");
	}

	//方法2.
	//..
	//..

	//...
}
- 降低类的复杂度,一个类只负责一项职责。
- 提高类的可读性,可维护性
- 降低变更引起的风险
- 通常情况下,我们应当遵守单一职责原则,只有逻辑足够简单,才可以在代码级违反单一职责原则;只有类中方法数量足够少,可以在方法级别保持单一职责原则
- 客户端不应该依赖它不需要的接口,即一个类对另一个类的依赖应该建立在最小的接口上
- 先看一张图

- 类 A 通过接口 Interface1 依赖类 B,类 C 通过接口 Interface1 依赖类 D,如果接口Interface1 对于类A和类C来说不是最小接口,那么类 B 和类 D 必须去实现他们不需要的方法。
- 按隔离原则应当这样处理:
将接口 Interface1 拆分为独立的几个接口(这里我们拆分成 3 个接口),类 A 和类C 分别与他们需要的接口建立依赖关系。也就是采用接口隔离原则
- 类 A 通过接口 Interface1 依赖类 B,类 C 通过接口 Interface1 依赖类 D,请编写代码完成此应用实例。
- 看代码-没有使用接口隔离原则代码
public class Segregation1 {public static void main(String[] args) {// TODO Auto-generated method stub

	}

}

//接口
interface Interface1 {void operation1();
	void operation2();
	void operation3();
	void operation4();
	void operation5();
}

class B implements Interface1 {public void operation1() {System.out.println("B 实现了 operation1");
	}

	public void operation2() {System.out.println("B 实现了 operation2");
	}
	public void operation3() {System.out.println("B 实现了 operation3");
	}
	public void operation4() {System.out.println("B 实现了 operation4");
	}
	public void operation5() {System.out.println("B 实现了 operation5");
	}
}

class D implements Interface1 {public void operation1() {System.out.println("D 实现了 operation1");
	}

	public void operation2() {System.out.println("D 实现了 operation2");
	}
	public void operation3() {System.out.println("D 实现了 operation3");
	}
	public void operation4() {System.out.println("D 实现了 operation4");
	}
	public void operation5() {System.out.println("D 实现了 operation5");
	}
}

class A {//A 类通过接口Interface1 依赖(使用) B类,但是只会用到1,2,3方法
	public void depend1(Interface1 i) {i.operation1();
	}
	public void depend2(Interface1 i) {i.operation2();
	}
	public void depend3(Interface1 i) {i.operation3();
	}
}

class C {//C 类通过接口Interface1 依赖(使用) D类,但是只会用到1,4,5方法
	public void depend1(Interface1 i) {i.operation1();
	}
	public void depend4(Interface1 i) {i.operation4();
	}
	public void depend5(Interface1 i) {i.operation5();
	}
}- 类 A 通过接口 Interface1 依赖类 B,类 C 通过接口 Interface1 依赖类 D,如果接口Interface1 对于类A和类C来说不是最小接口,那么类 B 和类 D 必须去实现他们不需要的方法
- 将接口 Interface1 拆分为独立的几个接口,类 A 和类 C 分别与他们需要的接口建立依赖关系。也就是采用接口隔离原则
- 接口 Interface1 中出现的方法,根据实际情况拆分为三个接口
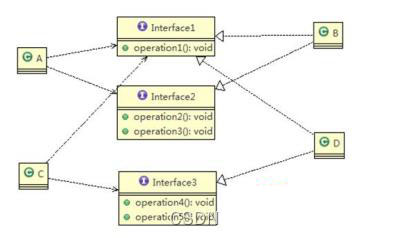
- 代码实现
package com.atguigu.principle.segregation.improve;

public class Segregation1 {public static void main(String[] args) {// TODO Auto-generated method stub
		// 使用一把
		A a = new A();
		a.depend1(new B()); // A类通过接口去依赖B类
		a.depend2(new B());
		a.depend3(new B());

		C c = new C();

		c.depend1(new D()); // C类通过接口去依赖(使用)D类
		c.depend4(new D());
		c.depend5(new D());

	}

}

// 接口1
interface Interface1 {void operation1();

}

// 接口2
interface Interface2 {void operation2();

	void operation3();
}

// 接口3
interface Interface3 {void operation4();

	void operation5();
}

class B implements Interface1, Interface2 {public void operation1() {System.out.println("B 实现了 operation1");
	}

	public void operation2() {System.out.println("B 实现了 operation2");
	}

	public void operation3() {System.out.println("B 实现了 operation3");
	}

}

class D implements Interface1, Interface3 {public void operation1() {System.out.println("D 实现了 operation1");
	}

	public void operation4() {System.out.println("D 实现了 operation4");
	}

	public void operation5() {System.out.println("D 实现了 operation5");
	}
}

class A {// A 类通过接口Interface1,Interface2 依赖(使用) B类,但是只会用到1,2,3方法
	public void depend1(Interface1 i) {i.operation1();
	}

	public void depend2(Interface2 i) {i.operation2();
	}

	public void depend3(Interface2 i) {i.operation3();
	}
}

class C {// C 类通过接口Interface1,Interface3 依赖(使用) D类,但是只会用到1,4,5方法
	public void depend1(Interface1 i) {i.operation1();
	}

	public void depend4(Interface3 i) {i.operation4();
	}

	public void depend5(Interface3 i) {i.operation5();
	}
}依赖倒转原则(Dependence Inversion Principle)是指:
- 高层模块不应该依赖低层模块,二者都应该依赖其抽象
- 抽象不应该依赖细节,细节应该依赖抽象
- 依赖倒转(倒置)的中心思想是面向接口编程
- 依赖倒转原则是基于这样的设计理念:相对于细节的多变性,抽象的东西要稳定的多。以抽象为基础搭建的架构比以细节为基础的架构要稳定的多。在 java 中,抽象指的是接口或抽象类,细节就是具体的实现类
- 使用接口或抽象类的目的是制定好规范,而不涉及任何具体的操作,把展现细节的任务交给他们的实现类去完成
请编程完成 Person 接收消息 的功能。
- 实现方案 1 + 分析说明
public class DependecyInversion {public static void main(String[] args) {Person person = new Person();
		person.receive(new Email());
	}

}


class Email {public String getInfo() {return "电子邮件信息: hello,world";
	}
}

//完成Person接收消息的功能
//方式1分析
//1. 简单,比较容易想到
//2. 如果我们获取的对象是 微信,短信等等,则新增类,同时Perons也要增加相应的接收方法
//3. 解决思路:引入一个抽象的接口IReceiver, 表示接收者, 这样Person类与接口IReceiver发生依赖
//   因为Email, WeiXin 等等属于接收的范围,他们各自实现IReceiver 接口就ok, 这样我们就符号依赖倒转原则
class Person {public void receive(Email email ) {System.out.println(email.getInfo());
	}
}
- 实现方案 2(依赖倒转) + 分析说明
package com.atguigu.principle.inversion.improve;

public class DependecyInversion {public static void main(String[] args) {//客户端无需改变
		Person person = new Person();
		person.receive(new Email());

		person.receive(new WeiXin());
	}

}

//定义接口
interface IReceiver {public String getInfo();
}

class Email implements IReceiver {public String getInfo() {return "电子邮件信息: hello,world";
	}
}

//增加微信
class WeiXin implements IReceiver {public String getInfo() {return "微信信息: hello,ok";
	}
}

//方式2
class Person {//这里我们是对接口的依赖
	public void receive(IReceiver receiver ) {System.out.println(receiver.getInfo());
	}
}- 接口传递
应用案例代码 - 构造方法传递
应用案例代码 - setter 方式传递
应用案例代码 - 代码演示
package com.atguigu.principle.inversion.improve;

public class DependencyPass {public static void main(String[] args) {// TODO Auto-generated method stub
		ChangHong changHong = new ChangHong();
//		OpenAndClose openAndClose = new OpenAndClose();
//		openAndClose.open(changHong);

		//通过构造器进行依赖传递
//		OpenAndClose openAndClose = new OpenAndClose(changHong);
//		openAndClose.open();
		//通过setter方法进行依赖传递
		OpenAndClose openAndClose = new OpenAndClose();
		openAndClose.setTv(changHong);
		openAndClose.open();

	}

}

// 方式1: 通过接口传递实现依赖
// 开关的接口
// interface IOpenAndClose {// public void open(ITV tv); //抽象方法,接收接口
// }
//
// interface ITV { //ITV接口
// public void play();
// }
//
// class ChangHong implements ITV {//
//	@Override
//	public void play() {//		// TODO Auto-generated method stub
//		System.out.println("长虹电视机,打开");
//	}
//
// }
 实现接口
// class OpenAndClose implements IOpenAndClose{// public void open(ITV tv){// tv.play();
// }
// }

// 方式2: 通过构造方法依赖传递
// interface IOpenAndClose {// public void open(); //抽象方法
// }
// interface ITV { //ITV接口
// public void play();
// }
// class OpenAndClose implements IOpenAndClose{// public ITV tv; //成员
// public OpenAndClose(ITV tv){ //构造器
// this.tv = tv;
// }
// public void open(){// this.tv.play();
// }
// }


// 方式3 , 通过setter方法传递
interface IOpenAndClose {public void open(); // 抽象方法

	public void setTv(ITV tv);
}

interface ITV {// ITV接口
	public void play();
}

class OpenAndClose implements IOpenAndClose {private ITV tv;

	public void setTv(ITV tv) {this.tv = tv;
	}

	public void open() {this.tv.play();
	}
}

class ChangHong implements ITV {@Override
	public void play() {// TODO Auto-generated method stub
		System.out.println("长虹电视机,打开");
	}

}- 低层模块尽量都要有抽象类或接口,或者两者都有,程序稳定性更好.
- 变量的声明类型尽量是抽象类或接口, 这样我们的变量引用和实际对象间,就存在一个缓冲层,利于程序扩展和优化
- 继承时遵循里氏替换原则
- 继承包含这样一层含义:父类中凡是已经实现好的方法,实际上是在设定规范和契约,虽然它不强制要求所有的子类必须遵循这些契约,但是如果子类对这些已经实现的方法任意修改,就会对整个继承体系造成破坏。
- 继承在给程序设计带来便利的同时,也带来了弊端。比如使用继承会给程序带来侵入性,程序的可移植性降低,增加对象间的耦合性,如果一个类被其他的类所继承,则当这个类需要修改时,必须考虑到所有的子类,并且父类修改后,所有涉及到子类的功能都有可能产生故障
- 问题提出:在编程中,如何正确的使用继承? =>里氏替换原则
- 里氏替换原则(Liskov Substitution Principle)在 1988 年,由麻省理工学院的以为姓里的女士提出的。2) 如果对每个类型为 T1 的对象 o1,都有类型为 T2 的对象 o2,使得以 T1 定义的所有程序P 在所有的对象o1都代换成 o2 时,程序 P 的行为没有发生变化,那么类型 T2 是类型 T1 的子类型。换句话说,所有引用基类的地方必须能透明地使用其子类的对象。
- 在使用继承时,遵循里氏替换原则,在子类中尽量不要重写父类的方法
- 里氏替换原则告诉我们,继承实际上让两个类耦合性增强了,在适当的情况下,可以通过聚合,组合,依赖来解决问题 。.
该看个程序, 思考下问题和解决思路
public class Liskov {public static void main(String[] args) {// TODO Auto-generated method stub
		A a = new A();
		System.out.println("11-3=" + a.func1(11, 3));
		System.out.println("1-8=" + a.func1(1, 8));

		System.out.println("-----------------------");
		B b = new B();
		System.out.println("11-3=" + b.func1(11, 3));//这里本意是求出11-3
		System.out.println("1-8=" + b.func1(1, 8));// 1-8
		System.out.println("11+3+9=" + b.func2(11, 3));


	}

}

// A类
class A {// 返回两个数的差
	public int func1(int num1, int num2) {return num1 - num2;
	}
}

// B类继承了A
// 增加了一个新功能:完成两个数相加,然后和9求和
class B extends A {//这里,重写了A类的方法, 可能是无意识
	public int func1(int a, int b) {return a + b;
	}

	public int func2(int a, int b) {return func1(a, b) + 9;
	}
}
- 我们发现原来运行正常的相减功能发生了错误。原因就是类 B 无意中重写了父类的方法,造成原有功能出现错误。在实际编程中,我们常常会通过重写父类的方法完成新的功能,这样写起来虽然简单,但整个继承体系的复用性会比较差。特别是运行多态比较频繁的时候
- 通用的做法是:原来的父类和子类都继承一个更通俗的基类,原有的继承关系去掉,采用依赖,聚合,组合等关系代替.
- 改进方案

代码实现
public class Liskov {public static void main(String[] args) {// TODO Auto-generated method stub
		A a = new A();
		System.out.println("11-3=" + a.func1(11, 3));
		System.out.println("1-8=" + a.func1(1, 8));

		System.out.println("-----------------------");
		B b = new B();
		//因为B类不再继承A类,因此调用者,不会再func1是求减法
		//调用完成的功能就会很明确
		System.out.println("11+3=" + b.func1(11, 3));//这里本意是求出11+3
		System.out.println("1+8=" + b.func1(1, 8));// 1+8
		System.out.println("11+3+9=" + b.func2(11, 3));


		//使用组合仍然可以使用到A类相关方法
		System.out.println("11-3=" + b.func3(11, 3));// 这里本意是求出11-3


	}

}

//创建一个更加基础的基类
class Base {//把更加基础的方法和成员写到Base类
}

// A类
class A extends Base {// 返回两个数的差
	public int func1(int num1, int num2) {return num1 - num2;
	}
}

// B类继承了A
// 增加了一个新功能:完成两个数相加,然后和9求和
class B extends Base {//如果B需要使用A类的方法,使用组合关系
	private A a = new A();

	//这里,重写了A类的方法, 可能是无意识
	public int func1(int a, int b) {return a + b;
	}

	public int func2(int a, int b) {return func1(a, b) + 9;
	}

	//我们仍然想使用A的方法
	public int func3(int a, int b) {return this.a.func1(a, b);
	}
}
- 开闭原则(Open Closed Principle)是编程中最基础、最重要的设计原则
- 一个软件实体如类,模块和函数应该对扩展开放(对提供方),对修改关闭(对使用方)。用抽象构建框架,用实现扩展细节。
- 当软件需要变化时,尽量通过扩展软件实体的行为来实现变化,而不是通过修改已有的代码来实现变化。
- 编程中遵循其它原则,以及使用设计模式的目的就是遵循开闭原则。
看一个画图形的功能。
类图设计,如下:
代码演示
package com.atguigu.principle.ocp;

public class Ocp {public static void main(String[] args) {//使用看看存在的问题
		GraphicEditor graphicEditor = new GraphicEditor();
		graphicEditor.drawShape(new Rectangle());
		graphicEditor.drawShape(new Circle());
		graphicEditor.drawShape(new Triangle());
	}

}

//这是一个用于绘图的类 [使用方]
class GraphicEditor {//接收Shape对象,然后根据type,来绘制不同的图形
	public void drawShape(Shape s) {if (s.m_type == 1)
			drawRectangle(s);
		else if (s.m_type == 2)
			drawCircle(s);
		else if (s.m_type == 3)
			drawTriangle(s);
	}

	//绘制矩形
	public void drawRectangle(Shape r) {System.out.println(" 绘制矩形 ");
	}

	//绘制圆形
	public void drawCircle(Shape r) {System.out.println(" 绘制圆形 ");
	}

	//绘制三角形
	public void drawTriangle(Shape r) {System.out.println(" 绘制三角形 ");
	}
}

//Shape类,基类
class Shape {int m_type;
}

class Rectangle extends Shape {Rectangle() {super.m_type = 1;
	}
}

class Circle extends Shape {Circle() {super.m_type = 2;
	}
}

//新增画三角形
class Triangle extends Shape {Triangle() {super.m_type = 3;
	}
}
- 优点是比较好理解,简单易操作。
- 缺点是违反了设计模式的 ocp 原则,即对扩展开放(提供方),对修改关闭(使用方)。即当我们给类增加新功能的时候,尽量不修改代码,或者尽可能少修改代码.
- 比如我们这时要新增加一个图形种类 三角形,我们需要做如下修改,修改的地方较多
- 代码演示
方式 1 的改进的思路分析
思路:把创建 Shape 类做成抽象类,并提供一个抽象的 draw 方法,让子类去实现即可,这样我们有新的图形种类时,只需要让新的图形类继承 Shape,并实现 draw 方法即可,使用方的代码就不需要修->满足了开闭原则
改进后的代码:
package com.atguigu.principle.ocp.improve;

public class Ocp {public static void main(String[] args) {//使用看看存在的问题
		GraphicEditor graphicEditor = new GraphicEditor();
		graphicEditor.drawShape(new Rectangle());
		graphicEditor.drawShape(new Circle());
		graphicEditor.drawShape(new Triangle());
		graphicEditor.drawShape(new OtherGraphic());
	}

}

//这是一个用于绘图的类 [使用方]
class GraphicEditor {//接收Shape对象,调用draw方法
	public void drawShape(Shape s) {s.draw();
	}


}

//Shape类,基类
abstract class Shape {int m_type;

	public abstract void draw();//抽象方法
}

class Rectangle extends Shape {Rectangle() {super.m_type = 1;
	}

	@Override
	public void draw() {// TODO Auto-generated method stub
		System.out.println(" 绘制矩形 ");
	}
}

class Circle extends Shape {Circle() {super.m_type = 2;
	}
	@Override
	public void draw() {// TODO Auto-generated method stub
		System.out.println(" 绘制圆形 ");
	}
}

//新增画三角形
class Triangle extends Shape {Triangle() {super.m_type = 3;
	}
	@Override
	public void draw() {// TODO Auto-generated method stub
		System.out.println(" 绘制三角形 ");
	}
}

//新增一个图形
class OtherGraphic extends Shape {OtherGraphic() {super.m_type = 4;
	}

	@Override
	public void draw() {// TODO Auto-generated method stub
		System.out.println(" 绘制其它图形 ");
	}
}
- 一个对象应该对其他对象保持最少的了解
- 类与类关系越密切,耦合度越大
- 迪米特法则(Demeter Principle)又叫最少知道原则,即一个类对自己依赖的类知道的越少越好。也就是说,对于被依赖的类不管多么复杂,都尽量将逻辑封装在类的内部。对外除了提供的 public 方法,不对外泄露任何信息
- 迪米特法则还有个更简单的定义:只与直接的朋友通信
- 直接的朋友:每个对象都会与其他对象有耦合关系,只要两个对象之间有耦合关系,我们就说这两个对象之间是朋友关系。耦合的方式很多,依赖,关联,组合,聚合等。其中,我们称出现成员变量,方法参数,方法返回值中的类为直接的朋友,而出现在局部变量中的类不是直接的朋友。也就是说,陌生的类最好不要以局部变量的形式出现在类的内部。
- 有一个学校,下属有各个学院和总部,现要求打印出学校总部员工 ID 和学院员工的id
- 编程实现上面的功能, 看代码演示
- 代码演示
package com.atguigu.principle.demeter;

import java.util.ArrayList;
import java.util.List;

//客户端
public class Demeter1 {public static void main(String[] args) {//创建了一个 SchoolManager 对象
		SchoolManager schoolManager = new SchoolManager();
		//输出学院的员工id 和  学校总部的员工信息
		schoolManager.printAllEmployee(new CollegeManager());

	}

}


//学校总部员工类
class Employee {private String id;

	public void setId(String id) {this.id = id;
	}

	public String getId() {return id;
	}
}


//学院的员工类
class CollegeEmployee {private String id;

	public void setId(String id) {this.id = id;
	}

	public String getId() {return id;
	}
}


//管理学院员工的管理类
class CollegeManager {//返回学院的所有员工
	public ListgetAllEmployee() {Listlist = new ArrayList();
		for (int i = 0; i< 10; i++) {//这里我们增加了10个员工到 list
			CollegeEmployee emp = new CollegeEmployee();
			emp.setId("学院员工id= " + i);
			list.add(emp);
		}
		return list;
	}
}

//学校管理类

//分析 SchoolManager 类的直接朋友类有哪些 Employee、CollegeManager
//CollegeEmployee 不是 直接朋友 而是一个陌生类,这样违背了 迪米特法则
class SchoolManager {//返回学校总部的员工
	public ListgetAllEmployee() {Listlist = new ArrayList();

		for (int i = 0; i< 5; i++) {//这里我们增加了5个员工到 list
			Employee emp = new Employee();
			emp.setId("学校总部员工id= " + i);
			list.add(emp);
		}
		return list;
	}

	//该方法完成输出学校总部和学院员工信息(id)
	void printAllEmployee(CollegeManager sub) {		//分析问题
		//1. 这里的 CollegeEmployee 不是  SchoolManager的直接朋友
		//2. CollegeEmployee 是以局部变量方式出现在 SchoolManager
		//3. 违反了 迪米特法则

		//获取到学院员工
		Listlist1 = sub.getAllEmployee();
		System.out.println("------------学院员工------------");
		for (CollegeEmployee e : list1) {	System.out.println(e.getId());
		}
		//获取到学校总部员工
		Listlist2 = this.getAllEmployee();
		System.out.println("------------学校总部员工------------");
		for (Employee e : list2) {	System.out.println(e.getId());
		}
	}
}
- 前面设计的问题在于 SchoolManager 中**,CollegeEmployee 类并不是 SchoolManager 类的直接朋友**(分析)
- 按照迪米特法则,应该避免类中出现这样非直接朋友关系的耦合
- 对代码按照迪米特法则 进行改进. (看老师演示)
- 代码演示
package com.atguigu.principle.demeter.improve;

import java.util.ArrayList;
import java.util.List;

//客户端
public class Demeter1 {public static void main(String[] args) {System.out.println("~~~使用迪米特法则的改进~~~");
		//创建了一个 SchoolManager 对象
		SchoolManager schoolManager = new SchoolManager();
		//输出学院的员工id 和  学校总部的员工信息
		schoolManager.printAllEmployee(new CollegeManager());

	}

}


//学校总部员工类
class Employee {private String id;

	public void setId(String id) {this.id = id;
	}

	public String getId() {return id;
	}
}


//学院的员工类
class CollegeEmployee {private String id;

	public void setId(String id) {this.id = id;
	}

	public String getId() {return id;
	}
}


//管理学院员工的管理类
class CollegeManager {//返回学院的所有员工
	public ListgetAllEmployee() {Listlist = new ArrayList();
		for (int i = 0; i< 10; i++) {//这里我们增加了10个员工到 list
			CollegeEmployee emp = new CollegeEmployee();
			emp.setId("学院员工id= " + i);
			list.add(emp);
		}
		return list;
	}

	//输出学院员工的信息
	public void printEmployee() {//获取到学院员工
		Listlist1 = getAllEmployee();
		System.out.println("------------学院员工------------");
		for (CollegeEmployee e : list1) {	System.out.println(e.getId());
		}
	}
}

//学校管理类

//分析 SchoolManager 类的直接朋友类有哪些 Employee、CollegeManager
//CollegeEmployee 不是 直接朋友 而是一个陌生类,这样违背了 迪米特法则
class SchoolManager {//返回学校总部的员工
	public ListgetAllEmployee() {Listlist = new ArrayList();

		for (int i = 0; i< 5; i++) {//这里我们增加了5个员工到 list
			Employee emp = new Employee();
			emp.setId("学校总部员工id= " + i);
			list.add(emp);
		}
		return list;
	}

	//该方法完成输出学校总部和学院员工信息(id)
	void printAllEmployee(CollegeManager sub) {		//分析问题
		//1. 将输出学院的员工方法,封装到CollegeManager
		sub.printEmployee();

		//获取到学校总部员工
		Listlist2 = this.getAllEmployee();
		System.out.println("------------学校总部员工------------");
		for (Employee e : list2) {	System.out.println(e.getId());
		}
	}
}
- 迪米特法则的核心是降低类之间的耦合
- 但是注意:由于每个类都减少了不必要的依赖,因此迪米特法则只是要求降低类间(对象间)耦合关系,并不是要求完全没有依赖关系
原则是尽量使用合成/聚合的方式,而不是使用继承
- 找出应用中可能需要变化之处,把它们独立出来,不要和那些不需要变化的代码混在一起。
- 针对接口编程,而不是针对实现编程。
- 为了交互对象之间的松耦合设计而努力
- UML——Unified modeling language UML (统一建模语言),是一种用于软件系统分析和设计的语言工具,它用于帮助软件开发人员进行思考和记录思路的结果
- UML 本身是一套符号的规定,就像数学符号和化学符号一样,这些符号用于描述软件模型中的各个元素和他们之间的关系,比如类、接口、实现、泛化、依赖、组合、聚合等,如右图:
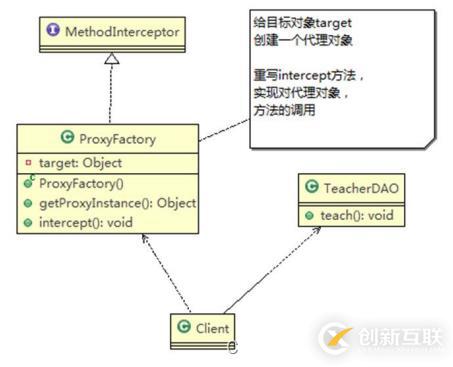

画 UML 图与写文章差不多,都是把自己的思想描述给别人看,关键在于思路和条理,UML 图分类:
- 用例图(use case)
- 静态结构图:类图、对象图、包图、组件图、部署图
- 动态行为图:交互图(时序图与协作图)、状态图、活动图
说明: - 类图是描述类与类之间的关系的,是 UML 图中最核心的
- 在讲解设计模式时,我们必然会使用类图,为了让学员们能够把设计模式学到位,需要先给大家讲解类图3) 温馨提示:如果已经掌握 UML 类图的学员,可以直接听设计模式的章节
- 用于描述系统中的类(对象)本身的组成和类(对象)之间的各种静态关系。
- 类之间的关系:依赖、泛化(继承)、实现、关联、聚合与组合。
- 类图简单举例
public class Person{//代码形式->类图
private Integer id;
private String name;
public void setName(String name){this.name=name;
}
public String getName(){return name;
}
}
只要是在类中用到了对方,那么他们之间就存在依赖关系。如果没有对方,连编绎都通过不了。
public class PersonServiceBean {private PersonDao personDao;//类

        public void save(Person person) {}

        public IDCard getIDCard(Integer personid) {}

        public void modify() {Department department = new Department();
        }
    }

    public class PersonDao {}

    public class IDCard {}

    public class Person {}

public class Department {} 对应的类图:
小结
- 类中用到了对方
- 如果是类的成员属性
- 如果是方法的返回类型
- 是方法接收的参数类型
- 方法中使用到
泛化关系实际上就是继承关系,他是依赖关系的特例
public abstract class DaoSupport {public void save(Object entity) {}

        public void delete(Object id) {}
    }

public class PersonServiceBean extends Daosupport {} 对应的类图
小结:
- 泛化关系实际上就是继承关系
- 如果 A 类继承了 B 类,我们就说 A 和 B 存在泛化关系
实现关系实际上就是A 类实现 B 接口,他是依赖关系的特例
public interface PersonService {public void delete(Interger id);
    }

    public class PersonServiceBean implements PersonService {public void delete(Interger id) {}
    }
=>类图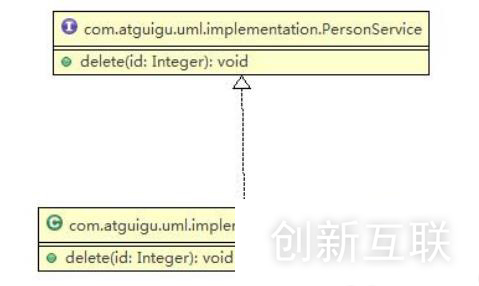
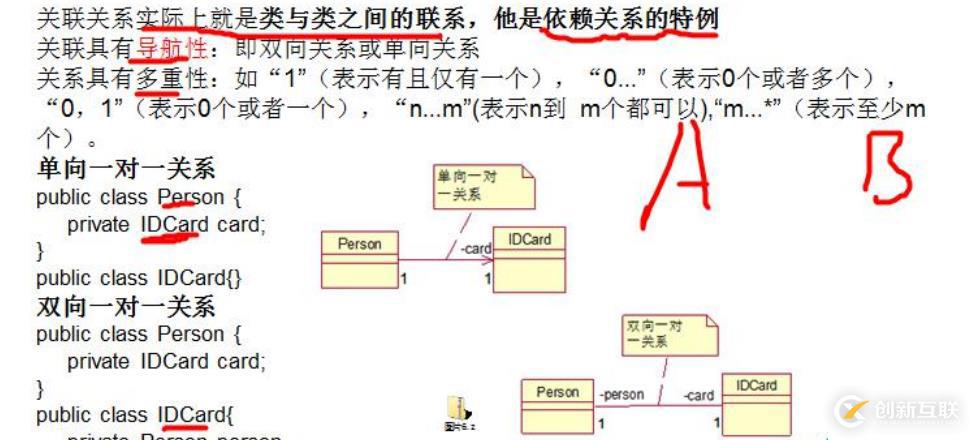
聚合关系(Aggregation)表示的是整体和部分的关系,整体与部分可以分开。聚合关系是关联关系的特例,所以他具有关联的导航性与多重性。
如:一台电脑由键盘(keyboard)、显示器(monitor),鼠标等组成;组成电脑的各个配件是可以从电脑上分离出来的,使用带空心菱形的实线来表示:

组合关系:也是整体与部分的关系,但是整体与部分不可以分开。
再看一个案例:在程序中我们定义实体:Person 与 IDCard、Head, 那么 Head 和 Person 就是组合,IDCard和Person 就是聚合。
但是如果在程序中 Person 实体中定义了对 IDCard 进行级联删除,即删除 Person 时连同IDCard 一起删除,那么 IDCard 和 Person 就是组合了.
public class Person {private IDCard card;
        private Head head = new Head();
    }

    public class IDCard {}

    public class Head {}
对应的类图:
案例 2
public class Computer {private Mouse mouse = new Mouse(); //鼠标可以和 computer 不能分离
        private Moniter moniter = new Moniter();//显示器可以和 Computer 不能分离

        public void setMouse(Mouse mouse) {this.mouse = mouse;
        }

        public void setMoniter(Moniter moniter) {this.moniter = moniter;
        }
    }

    public class Mouse {}

    public class Moniter {}
对应的类图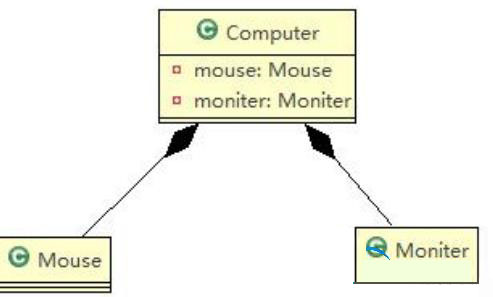
- 第 1 层:刚开始学编程不久,听说过什么是设计模式
- 第 2 层:有很长时间的编程经验,自己写了很多代码,其中用到了设计模式,但是自己却不知道
- 第 3 层:学习过了设计模式,发现自己已经在使用了,并且发现了一些新的模式挺好用的
- 第 4 层:阅读了很多别人写的源码和框架,在其中看到别人设计模式,并且能够领会设计模式的精妙和带来的好处。
- 第 5 层:代码写着写着,自己都没有意识到使用了设计模式,并且熟练的写了出来。
- 设计模式是程序员在面对同类软件工程设计问题所总结出来的有用的经验,模式不是代码,而是某类问题的通用解决方案,设计模式(Design pattern)代表了最佳的实践。这些解决方案是众多软件开发人员经过相当长的一段时间的试验和错误总结出来的。
- 设计模式的本质提高 软件的维护性,通用性和扩展性,并降低软件的复杂度。
- <<设计模式>>是经典的书,作者是 Erich Gamma、Richard Helm、Ralph Johnson 和John Vlissides Design(俗称 “四人组 GOF”)
- 设计模式并不局限于某种语言,java,php,c++ 都有设计模式.
设计模式分为三种类型,共 23 种
- 创建型模式:单例模式、抽象工厂模式、原型模式、建造者模式、工厂模式。
- 结构型模式:适配器模式、桥接模式、装饰模式、组合模式、外观模式、享元模式、代理模式。3) 行为型模式:模版方法模式、命令模式、访问者模式、迭代器模式、观察者模式、中介者模式、备忘录模式、解释器模式(Interpreter 模式)、状态模式、策略模式、职责链模式(责任链模式)。注意:不同的书籍上对分类和名称略有差别
所谓类的单例设计模式,就是采取一定的方法保证在整个的软件系统中,对某个类只能存在一个对象实例,并且该类只提供一个取得其对象实例的方法(静态方法)。
比如 Hibernate 的 SessionFactory,它充当数据存储源的代理,并负责创建 Session 对象。SessionFactory并不是轻量级的,一般情况下,一个项目通常只需要一个 SessionFactory 就够,这是就会使用到单例模式。
单例模式有八种方式:
1) 饿汉式(静态常量)
2) 饿汉式(静态代码块)
3) 懒汉式(线程不安全)
4) 懒汉式(线程安全,同步方法)
5) 懒汉式(线程安全,同步代码块)
6) 双重检查
7) 静态内部类
8) 枚举
饿汉式(静态常量)应用实例
步骤如下:
- 构造器私有化 (防止 new )
- 类的内部创建对象
- 向外暴露一个静态的公共方法。getInstance
- 代码实现
package com.atguigu.singleton.type1;

public class SingletonTest01 {public static void main(String[] args) {//测试
		Singleton instance = Singleton.getInstance();
		Singleton instance2 = Singleton.getInstance();
		System.out.println(instance == instance2); // true
		System.out.println("instance.hashCode=" + instance.hashCode());
		System.out.println("instance2.hashCode=" + instance2.hashCode());
	}

}

//饿汉式(静态变量)

class Singleton {	//1. 构造器私有化, 外部能new
	private Singleton() {	}

	//2.本类内部创建对象实例
	private final static Singleton instance = new Singleton();

	//3. 提供一个公有的静态方法,返回实例对象
	public static Singleton getInstance() {return instance;
	}

} 优缺点说明:
- 优点:这种写法比较简单,就是在类装载的时候就完成实例化。避免了线程同步问题。2) 缺点:在类装载的时候就完成实例化,没有达到 Lazy Loading 的效果。如果从始至终从未使用过这个实例,则会造成内存的浪费
- 这种方式基于 classloder 机制避免了多线程的同步问题,不过,instance 在类装载时就实例化,在单例模式中大多数都是调用 getInstance 方法,但是导致类装载的原因有很多种,因此不能确定有其他的方式(或者其他的静态方法)导致类装载,这时候初始化 instance 就没有达到 lazy loading 的效果
- 结论:这种单例模式可用,可能造成内存浪费
代码演示:
package com.atguigu.singleton.type2;

public class SingletonTest02 {public static void main(String[] args) {//测试
		Singleton instance = Singleton.getInstance();
		Singleton instance2 = Singleton.getInstance();
		System.out.println(instance == instance2); // true
		System.out.println("instance.hashCode=" + instance.hashCode());
		System.out.println("instance2.hashCode=" + instance2.hashCode());
	}

}

//饿汉式(静态变量)

class Singleton {	//1. 构造器私有化, 外部能new
	private Singleton() {	}


	//2.本类内部创建对象实例
	private  static Singleton instance;

	static {// 在静态代码块中,创建单例对象
		instance = new Singleton();
	}

	//3. 提供一个公有的静态方法,返回实例对象
	public static Singleton getInstance() {return instance;
	}

} 优缺点说明:
- 这种方式和上面的方式其实类似,只不过将类实例化的过程放在了静态代码块中,也是在类装载的时候,就执行静态代码块中的代码,初始化类的实例。优缺点和上面是一样的。
- 结论:这种单例模式可用,但是可能造成内存浪费
代码演示:
package com.atguigu.singleton.type3;


public class SingletonTest03 {public static void main(String[] args) {System.out.println("懒汉式1 , 线程不安全~");
		Singleton instance = Singleton.getInstance();
		Singleton instance2 = Singleton.getInstance();
		System.out.println(instance == instance2); // true
		System.out.println("instance.hashCode=" + instance.hashCode());
		System.out.println("instance2.hashCode=" + instance2.hashCode());
	}

}

class Singleton {private static Singleton instance;

	private Singleton() {}

	//提供一个静态的公有方法,当使用到该方法时,才去创建 instance
	//即懒汉式
	public static Singleton getInstance() {if(instance == null) {	instance = new Singleton();
		}
		return instance;
	}
} 优缺点说明:
- 起到了 Lazy Loading 的效果,但是只能在单线程下使用。
- 如果在多线程下,一个线程进入了 if (singleton == null)判断语句块,还未来得及往下执行,另一个线程也通过了这个判断语句,这时便会产生多个实例。所以在多线程环境下不可使用这种方式3) 结论:在实际开发中,不要使用这种方式.
代码演示:
package com.atguigu.singleton.type4;


public class SingletonTest04 {public static void main(String[] args) {System.out.println("懒汉式2 , 线程安全~");
		Singleton instance = Singleton.getInstance();
		Singleton instance2 = Singleton.getInstance();
		System.out.println(instance == instance2); // true
		System.out.println("instance.hashCode=" + instance.hashCode());
		System.out.println("instance2.hashCode=" + instance2.hashCode());
	}

}

// 懒汉式(线程安全,同步方法)
class Singleton {private static Singleton instance;

	private Singleton() {}

	//提供一个静态的公有方法,加入同步处理的代码,解决线程安全问题
	//即懒汉式
	public static synchronized Singleton getInstance() {if(instance == null) {	instance = new Singleton();
		}
		return instance;
	}
} 优缺点说明:
- 解决了线程安全问题
- 效率太低了,每个线程在想获得类的实例时候,执行 getInstance()方法都要进行同步。而其实这个方法只执行一次实例化代码就够了,后面的想获得该类实例,直接 return 就行了。方法进行同步效率太低
- 结论:在实际开发中,不推荐使用这种方式

不推荐使用
代码演示
package com.atguigu.singleton.type6;


public class SingletonTest06 {public static void main(String[] args) {System.out.println("双重检查");
		Singleton instance = Singleton.getInstance();
		Singleton instance2 = Singleton.getInstance();
		System.out.println(instance == instance2); // true
		System.out.println("instance.hashCode=" + instance.hashCode());
		System.out.println("instance2.hashCode=" + instance2.hashCode());

	}

}

// 懒汉式(线程安全,同步方法)
class Singleton {private static volatile Singleton instance;

	private Singleton() {}

	//提供一个静态的公有方法,加入双重检查代码,解决线程安全问题, 同时解决懒加载问题
	//同时保证了效率, 推荐使用

	public static synchronized Singleton getInstance() {if(instance == null) {	synchronized (Singleton.class) {		if(instance == null) {instance = new Singleton();
				}
			}

		}
		return instance;
	}
} 优缺点说明:
- Double-Check 概念是多线程开发中常使用到的,如代码中所示,我们进行了两次if (singleton = = null)检查,这样就可以保证线程安全了。
- 这样,实例化代码只用执行一次,后面再次访问时,判断 if (singleton == null),直接return 实例化对象,也避免的反复进行方法同步.
- 线程安全;延迟加载;效率较高
- 结论:在实际开发中,推荐使用这种单例设计模式
5.9 静态内部类
代码演示:
package com.atguigu.singleton.type7;


public class SingletonTest07 {public static void main(String[] args) {System.out.println("使用静态内部类完成单例模式");
		Singleton instance = Singleton.getInstance();
		Singleton instance2 = Singleton.getInstance();
		System.out.println(instance == instance2); // true
		System.out.println("instance.hashCode=" + instance.hashCode());
		System.out.println("instance2.hashCode=" + instance2.hashCode());

	}

}

// 静态内部类完成, 推荐使用
class Singleton {private static volatile Singleton instance;

	//构造器私有化
	private Singleton() {}

	//写一个静态内部类,该类中有一个静态属性 Singleton
	private static class SingletonInstance {private static final Singleton INSTANCE = new Singleton();
	}

	//提供一个静态的公有方法,直接返回SingletonInstance.INSTANCE

	public static synchronized Singleton getInstance() {		return SingletonInstance.INSTANCE;
	}
} 优缺点说明:
- 这种方式采用了类装载的机制来保证初始化实例时只有一个线程。
- 静态内部类方式在 Singleton 类被装载时并不会立即实例化,而是在需要实例化时,调用getInstance 方法,才会装载 SingletonInstance 类,从而完成 Singleton 的实例化。
- 类的静态属性只会在第一次加载类的时候初始化,所以在这里,JVM 帮助我们保证了线程的安全性,在类进行初始化时,别的线程是无法进入的。
- 优点:避免了线程不安全,利用静态内部类特点实现延迟加载,效率高
- 结论:推荐使用
代码演示
package com.atguigu.singleton.type8;

public class SingletonTest08 {public static void main(String[] args) {Singleton instance = Singleton.INSTANCE;
		Singleton instance2 = Singleton.INSTANCE;
		System.out.println(instance == instance2);

		System.out.println(instance.hashCode());
		System.out.println(instance2.hashCode());

		instance.sayOK();
	}
}

//使用枚举,可以实现单例, 推荐
enum Singleton {INSTANCE; //属性
	public void sayOK() {System.out.println("ok~");
	}
} 优缺点说明:
- 这借助 JDK1.5 中添加的枚举来实现单例模式。不仅能避免多线程同步问题,而且还能防止反序列化重新创建新的对象。
- 这种方式是 Effective Java 作者 Josh Bloch 提倡的方式
- 结论:推荐使用
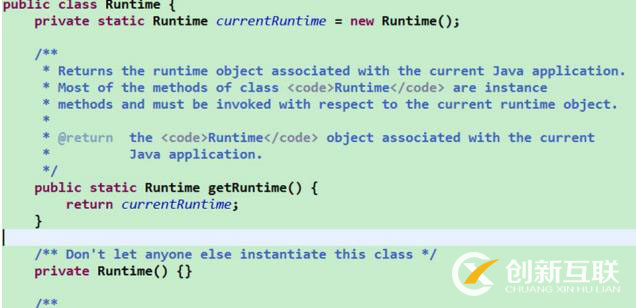
- 我们 JDK 中,java.lang.Runtime 就是经典的单例模式(饿汉式)
- 代码分析+Debug 源码+代码说明
- 单例模式保证了 系统内存中该类只存在一个对象,节省了系统资源,对于一些需要频繁创建销毁的对象,使用单例模式可以提高系统性能
- 当想实例化一个单例类的时候,必须要记住使用相应的获取对象的方法,而不是使用new
- 单例模式使用的场景:需要频繁的进行创建和销毁的对象、创建对象时耗时过多或耗费资源过多(即:重量级对象),但又经常用到的对象、工具类对象、频繁访问数据库或文件的对象(比如数据源、session 工厂等)
你是否还在寻找稳定的海外服务器提供商?创新互联www.cdcxhl.cn海外机房具备T级流量清洗系统配攻击溯源,准确流量调度确保服务器高可用性,企业级服务器适合批量采购,新人活动首月15元起,快前往官网查看详情吧
网页题目:java设计模式-创新互联
网站地址:https://www.cdcxhl.com/article48/ghjep.html
成都网站建设公司_创新互联,为您提供企业建站、网站建设、网站内链、定制网站、云服务器、小程序开发
声明:本网站发布的内容(图片、视频和文字)以用户投稿、用户转载内容为主,如果涉及侵权请尽快告知,我们将会在第一时间删除。文章观点不代表本网站立场,如需处理请联系客服。电话:028-86922220;邮箱:631063699@qq.com。内容未经允许不得转载,或转载时需注明来源: 创新互联

- 网站导航设计注意事项 2016-06-11
- 网站建设优化网站导航栏设计要点 2016-11-08
- 网站导航要围绕用户体验来进行规划实施 2021-07-27
- 网站导航设计:如何正确认识导航条 2022-08-15
- 网站导航设计-导航制作需要留意的7大关键点 2016-11-11
- 网站导航优化注意事项有哪些? 2023-04-16
- 网站导航建设如何遵循关键词优化技巧? 2022-08-04
- 网站导航设计要点有哪些? 2021-01-09
- 网站导航能为网站优化起到什么作用? 2013-06-07
- 网站导航如何做SEO优化?又快又准是关键 2016-10-26
- 网站导航系统设计与内部链接策略 2020-11-12
- 重庆网站优化:网站导航怎么设置才符合seo的标准? 2023-03-28