实现DNS主从域,http虚拟主机跟用户
DNS
域名解析是把域名指向网站空间IP,让人们通过注册的域名可以方便地访问到网站的一种服务。IP地址是网络上标识站点的数字地址,为了方便记忆,采用域名来代替IP地址标识站点地址。域名解析就是域名到IP地址的转换过程。域名的解析工作由DNS服务器完成。
1、安装dns服务器
[root@localhost ~]# yum -y install bind*
2、修改配置文件
在/etc/named.conf中:
创新互联建站专注于麻栗坡网站建设服务及定制,我们拥有丰富的企业做网站经验。 热诚为您提供麻栗坡营销型网站建设,麻栗坡网站制作、麻栗坡网页设计、麻栗坡网站官网定制、微信平台小程序开发服务,打造麻栗坡网络公司原创品牌,更为您提供麻栗坡网站排名全网营销落地服务。
 listen-on port 53 { any; };
  allow-query     { any; };
然后创建解析:
vim /etc/named.rfc1912.zones
zone "web1.com" IN {
    type master;
    file "data/web1.com.zone";
        };
在/var/named/data/中创建web1.com.zone文件如下
$TTL 3H
@       IN SOA  web1.com. root (
                                        20180928 ; serial
                                        1D      ; refresh
                                        1H      ; retry
                                        1W      ; expire
                                        3H )    ; minimum
        IN   NS            @
        IN   A          192.168.159.130
www     IN   A          192.168.159.130
3.启动named服务:
systemctl start named

ps -ef | grep named
显示启动成功
4 测试
[root@localhost ~]# nslookup
> web1.com
Server:         192.168.159.130
Address:        192.168.159.130#53

Name:   web1.com
Address: 192.168.159.130
5.dns从域设置
 vim /etc/named.rfc1912.zones
zone "web1.com" IN {
    type slave;
    file "slaves/web1.com.zone";
    masters { 192.168.159.130;};
};
重启服务后:
[root@localhost ~]# nslookup
> web1.com
Server:         192.168.159.131
Address:        192.168.159.131#53

Name:   web1.com
Address: 192.168.159.130
HTTP
1安装HTTP服务
yum -y install httpd
2.编辑配置文件创建两个虚拟主机
vim /etc/httpd/conf/httpd.conf
<VirtualHost 192.168.159.130:80>
       ServerAdmin webmaster@dummy-host.example.com
       DocumentRoot /var/www/html/host1/
       ServerName 192.168.159.130
       ErrorLog logs/dummy-host.example.com-error_log
       CustomLog logs/dummy-host.example.com-access_log common

</VirtualHost>
<VirtualHost 192.168.159.129:80>
       ServerAdmin webmaster@dummy-host.example.com
       ServerAdmin webmaster@dummy-host.example.com
       DocumentRoot /var/www/html/host1/
       ServerName 192.168.159.130
       ErrorLog logs/dummy-host.example.com-error_log
       CustomLog logs/dummy-host.example.com-access_log common
</VirtualHost>
3.添加一个地址
ip addr add 192.168.159.129 dev ens33
4 编辑主页文件
[root@localhost conf]# cat /var/www/html/vhost1/index.html
床前明月光
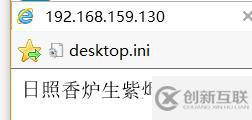
[root@localhost conf]# cat /var/www/html/host1/index.html
日照香炉生紫烟5 访问成功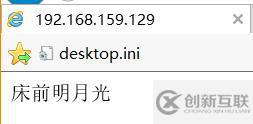
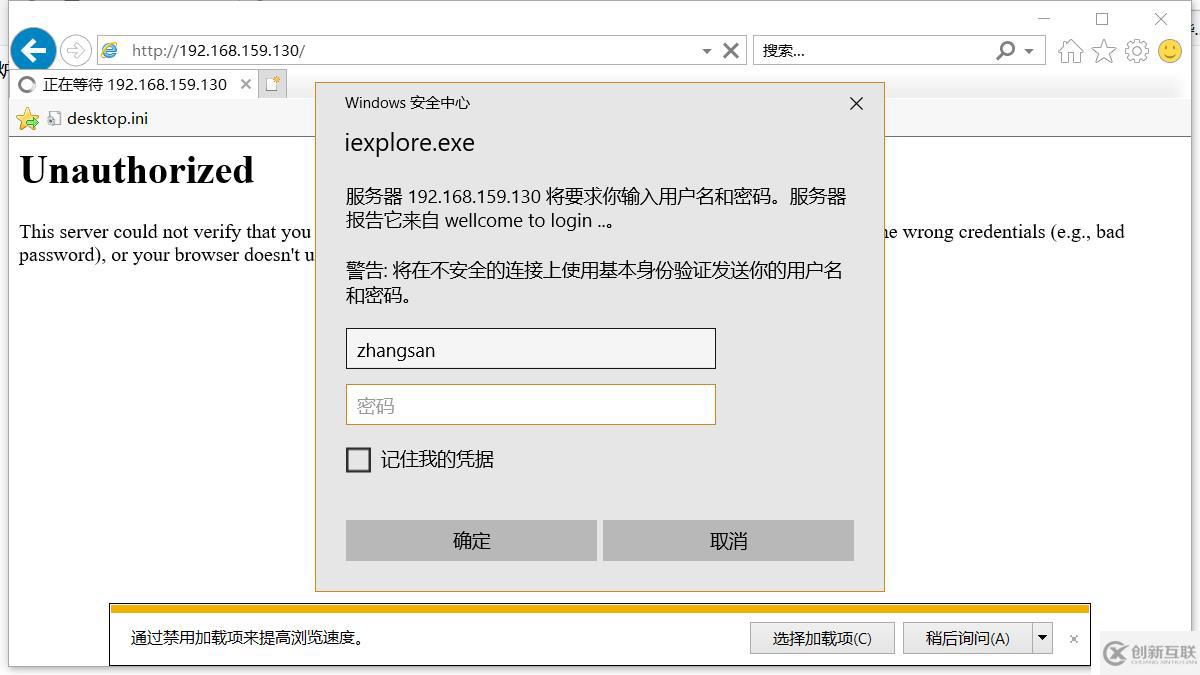
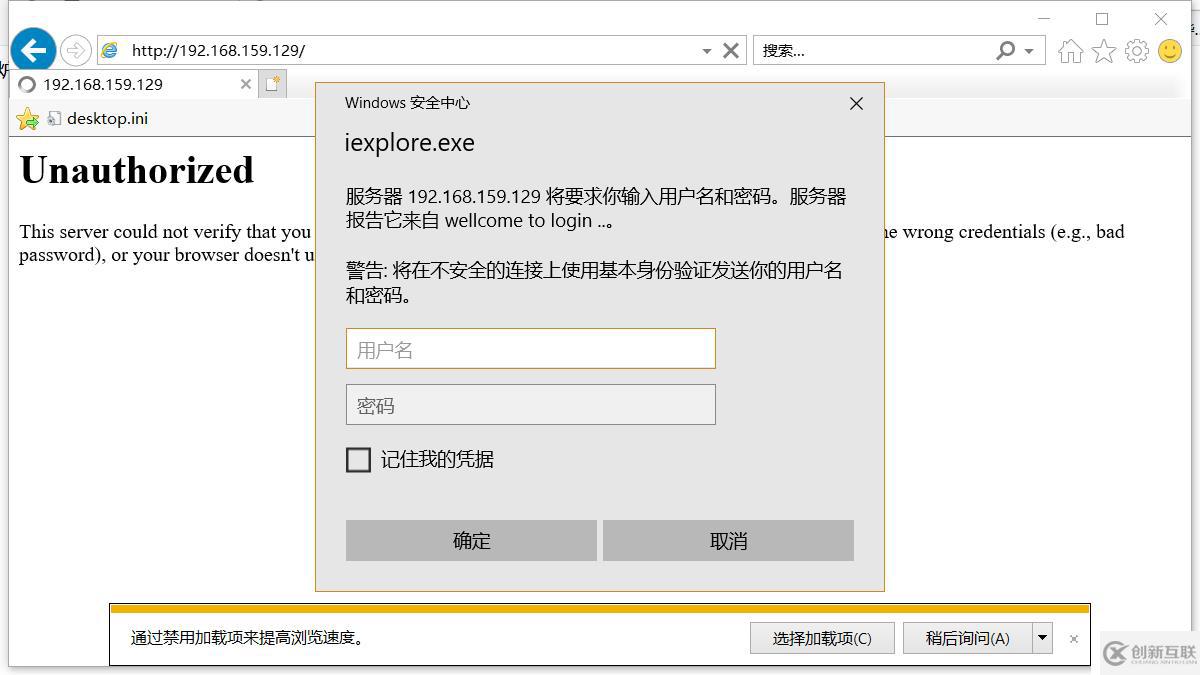
6 配置访问控制
在相应的地方插入以下哦欸之
<Directory "/var/www/html/vhost1">
        options None
        AllowOverRide AuthConfig
        AuthType Basic
        AuthName "wellcome to login .."
        AuthBasicProvider file
        AuthUserFile /etc/httpd/conf/.htpwd
        Require user zhangsan lisi
    </Directory>
         <Directory "/var/www/html/host1">
        options None
        AllowOverRide AuthConfig
        AuthType Basic
        AuthName "wellcome to login .."
        AuthBasicProvider file
        AuthUserFile /etc/httpd/conf/.htpwd
        Require user zhangsan lisi
    </Directory>
创建用户密码
  htpasswd -c -m /etc/httpd/conf/.htpwd zhangsan
    htpasswd -m /etc/httpd/conf/.htpwd  lisi
   htpasswd -m /etc/httpd/conf/.htpwd  wangwu
7访问控制
网页标题:实现DNS主从域,http虚拟主机跟用户
转载来于:https://www.cdcxhl.com/article42/iijehc.html
成都网站建设公司_创新互联,为您提供、标签优化、网页设计公司、移动网站建设、商城网站、网站策划
声明:本网站发布的内容(图片、视频和文字)以用户投稿、用户转载内容为主,如果涉及侵权请尽快告知,我们将会在第一时间删除。文章观点不代表本网站立场,如需处理请联系客服。电话:028-86922220;邮箱:631063699@qq.com。内容未经允许不得转载,或转载时需注明来源: 创新互联

- 东大桥app开发公司 2022-03-17
- 怎样选择一家更好的北京APP开发公司 2021-05-28
- 智慧农业类软件APP开发好处和特点 2020-12-06
- 手机APP开发框架的选择 2022-02-28
- 健康饮食APP开发势不可挡,跟着健康走,美食任你选! 2022-08-29
- 临泉线上办公APP开发及应用趋势分析 2020-12-11
- app开发公司全力火开,合理规划APP定制策略 2023-03-20
- 海外代购APP开发有哪些环节需要注意 2022-06-27
- 镜湖英语培训类APP开发核心功能有哪些 2020-12-10
- APP从业者必知的整个APP开发标准流程 2022-11-13
- 昆明APP开发:如何降低卸载率? 2023-03-12
- 原生H5开发体验,创新互联小程序、APP开发 2022-09-30