Android切近实战(四)-创新互联
上一节我们看了系统参数的主界面,大家应该还有印象,如下

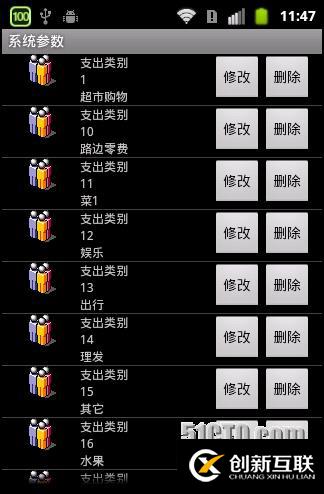
那本节我们来看一下修改和***。
上节我已经介绍了系统参数修改以及***的WebService,如下
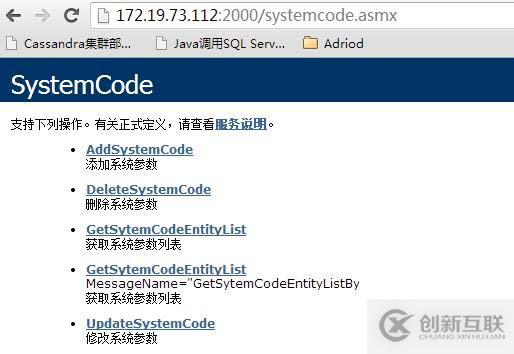
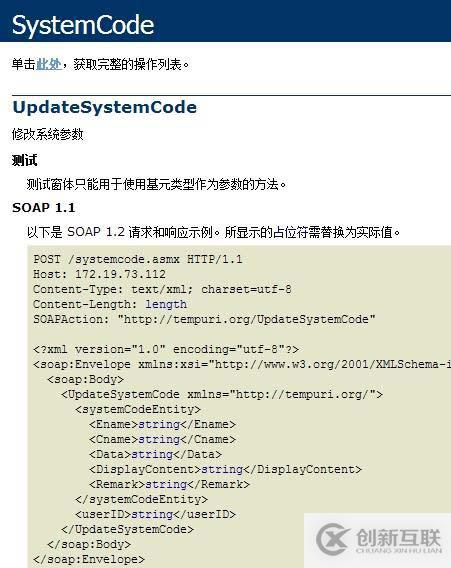
其中系统参数修改的描述如下
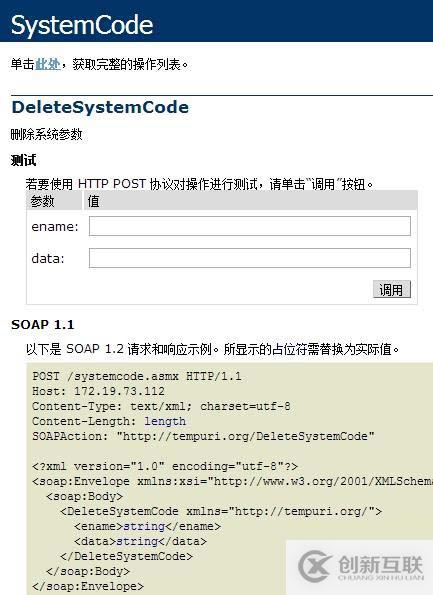
系统参数***的定义如下
接下来我们需要知道的是如何实现修改和***按钮的功能。记得上节我们使用系统提供的SimpleAdapter去展示listview的数据。这样是无法实现按钮的响应的。所以在实现这两个按钮的功能之前,首先需要让他们能够响应点击事件。所以需要我们自己定义Adapter。
public class customAdapter extends BaseAdapter {
		private List<Map<String, Object>> dataList;
		private LayoutInflater mInflater;
		private Context context;
		private String[] keyString;
		private int[] valueViewID;
		Holder holder;

		public customAdapter(Context context,
				List<Map<String, Object>> dataList, int resource,
				String[] from, int[] to) {
			this.dataList = dataList;
			this.context = context;
			mInflater = (LayoutInflater) this.context
					.getSystemService(Context.LAYOUT_INFLATER_SERVICE);
			keyString = new String[from.length];
			valueViewID = new int[to.length];
			System.arraycopy(from, 0, keyString, 0, from.length);
			System.arraycopy(to, 0, valueViewID, 0, to.length);
		}

		@Override
		public int getCount() {
			return dataList.size();
		}

		@Override
		public Object getItem(int position) {
			return dataList.get(position);
		}

		@Override
		public long getItemId(int position) {
			return position;
		}

		public void removeItem(int position) {
			dataList.remove(position);
			this.notifyDataSetChanged();
		}

		public View getView(int position, View convertView, ViewGroup parent) {

			if (convertView != null) {
				holder = (Holder) convertView.getTag();
			} else {
				convertView = mInflater.inflate(
						R.layout.systemcodedetailtemplate, null);
				holder = new Holder();
				holder.labCname = (TextView) convertView
						.findViewById(valueViewID[0]);
				holder.labData = (TextView) convertView
						.findViewById(valueViewID[1]);
				holder.labDisplay = (TextView) convertView
						.findViewById(valueViewID[2]);
				holder.btnUpdate = (Button) convertView
						.findViewById(valueViewID[3]);
				holder.btnDelete = (Button) convertView
						.findViewById(valueViewID[4]);

				convertView.setTag(holder);
			}

			Map<String, Object> appInfo = dataList.get(position);
			if (appInfo != null) {
				String cname = appInfo.get(keyString[0]).toString();
				String data = appInfo.get(keyString[1]).toString();
				String displayContent = appInfo.get(keyString[2]).toString();

				holder.labCname.setText(cname);
				holder.labData.setText(data);
				holder.labDisplay.setText(displayContent);
				holder.btnDelete.setOnClickListener(new ViewButtonListener(
						position));

				holder.btnUpdate.setOnClickListener(new ViewButtonListener(
						position));
			}
			return convertView;
		}
在构造函数中我们传入了数据源,得到加载xml布局文件的实例化对象mInflater,以及传递进来的数据源Map<String, Object>中的key值,页面中的元素的id,用来和key值取到的value作对应匹配。
然后再覆盖BaseAdapter的一些方法。在这里主要看这个getView。
首先判断是否已经加载了根布局模版,如果已加载,则获取Holder,否则实例化holder,并将模版内的元素赋给Holder。这个Holder怎么理解呢,我觉得是xml布局模版上元素的载体。通过Holder可以拿到该模版上的任何元素。接下来这个appInfo就是当前界面上listview所选择的行的数据Map<String, Object>,所以在这里我们可以通过key值拿到value。难道以后将值赋给Holder载体中的各个对应元素
String cname = appInfo.get(keyString[0]).toString();
				String data = appInfo.get(keyString[1]).toString();
				String displayContent = appInfo.get(keyString[2]).toString();

				holder.labCname.setText(cname);
				holder.labData.setText(data);
				holder.labDisplay.setText(displayContent);
OK,这个其实就是重写实现listView的展示。接下来我们来看这次的重点
holder.btnDelete.setOnClickListener(new ViewButtonListener(
						position));

				holder.btnUpdate.setOnClickListener(new ViewButtonListener(
						position));
这两个按钮是我们第一幅图中的最右边的两个操作按钮。我们分别为其注册了单击事件监听,它的监听实现类是ViewButtonListener,我们看一下
class ViewButtonListener implements OnClickListener {
			private int position;
			Object cname;
			Object data;
			Object displayContent;
			EditText txtEname;
			EditText txtCname;
			EditText txtData;
			EditText txtDisplayContent;
			EditText txtRemark;
			View layout;

			ViewButtonListener(int position) {
				this.position = position;
				cname = dataList.get(position).get("cname");
				data = dataList.get(position).get("data");
				displayContent = dataList.get(position).get("displaycontent");

				LayoutInflater inflater = getLayoutInflater();

				layout = inflater.inflate(R.layout.systemcodemodify,
						(ViewGroup) findViewById(R.id.modifyDialog));
				txtEname = (EditText) layout.findViewById(R.id.txtEname);
				txtCname = (EditText) layout.findViewById(R.id.txtCname);
				txtData = (EditText) layout.findViewById(R.id.txtData);
				txtDisplayContent = (EditText) layout
						.findViewById(R.id.txtDisplay);
				txtRemark = (EditText) layout.findViewById(R.id.txtRemark);
			}

			@Override
			public void onClick(View view) {
				int vid = view.getId();

				if (vid == holder.btnUpdate.getId()) {
					txtEname.setText(owner.ename);
					txtCname.setText(cname.toString());
					txtData.setText(data.toString());
					txtDisplayContent.setText(displayContent.toString());

					txtEname.setEnabled(false);
					txtCname.setEnabled(false);
					txtData.setEnabled(false);

					final AlertDialog.Builder builder = new AlertDialog.Builder(
							owner);
					builder.setIcon(R.drawable.info);
					builder.setTitle(R.string.titleSystemCodeModifyName);
					builder.setView(layout);
					builder.setPositiveButton(R.string.btnSave, null);
					builder.setNegativeButton(R.string.btnClose,null);

					final AlertDialog dialog = builder.create();
					dialog.show();

					dialog.getButton(AlertDialog.BUTTON_POSITIVE)
							.setOnClickListener(new View.OnClickListener() {
								@Override
								public void onClick(View v) {
									if (txtDisplayContent.getText().toString()
											.trim().length() == 0) {
										ShowMessage("显示值不能为空!");
										return;
									}

									SoapObject soapObject = new systemcodedetail()
											.ModifySystemCode(ename, data
													.toString(), txtDisplayContent.getText().toString().trim()
													.toString(), txtRemark
													.getText().toString());
									Boolean isSuccess = Boolean
											.valueOf(soapObject.getProperty(
													"IsSuccess").toString());

									if (isSuccess) {
										ShowMessage(R.string.SaveSuccess);
										dialog.dismiss();
									} else {
										String errorMsg = soapObject
												.getProperty("ErrorMessage")
												.toString();
										ShowMessage(errorMsg);
									}
								}
							});

				} else if (vid == holder.btnDelete.getId()) {

					SoapObject soapObject = new systemcodedetail()
							.DeleteSystemCode(ename, data.toString());

					Boolean isSuccess = Boolean.valueOf(soapObject.getProperty(
							"IsSuccess").toString());

					if (isSuccess) {
						ShowMessage(R.string.DeleteSuccess);
					} else {
						String errorMsg = soapObject
								.getProperty("ErrorMessage").toString();
						ShowMessage(errorMsg);
					}
				}
			}
		}

		class Holder {
			public TextView labCname;
			public TextView labDisplay;
			public TextView labData;
			public Button btnUpdate;
			public Button btnDelete;
		}
	}
OK,我们看到了,在构造函数中,我们拿到了各个元素,因为我们的保存和***按钮的监听那个实现类都是ViewButtonListener。因此在Onclick事件中,我们需要得知是哪个按钮触发了事件。所以先获取一下id,如果id是btnUpdate。那么就走修改逻辑,否则走***逻辑。
首先来看一下修改逻辑,创建一个dialog,这个dialog加载的是一个activity,弹出的界面是什么呢,在构造函数中有这样一段
layout = inflater.inflate(R.layout.systemcodemodify,
						(ViewGroup) findViewById(R.id.modifyDialog));
在创建dialog的时候我们也看到了这句
builder.setView(layout);
所以弹出的界面就是R.layout.systemcodemodfy。我们来看一下这个界面
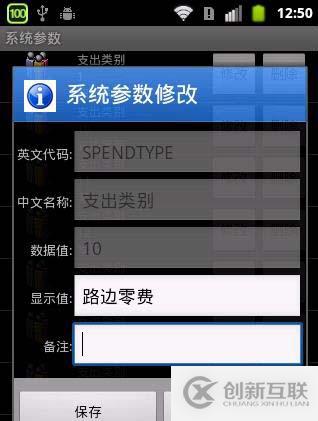
<?xml version="1.0" encoding="utf-8"?>
<LinearLayout xmlns:android="http://schemas.android.com/apk/res/android"
	android:layout_width="match_parent" android:layout_height="match_parent"
	android:id="@+id/modifyDialog" android:orientation="vertical">
	<TableLayout android:id="@+id/tabMain"
		android:layout_width="fill_parent" android:layout_height="wrap_content"
		android:padding="3dip" android:stretchColumns="1">
		<TableRow>
			<TextView android:text="@string/labEname" android:textSize="6pt"
				android:gravity="right" />
			<EditText android:id="@+id/txtEname" android:maxLength="25"
				android:singleLine="true"></EditText>
		</TableRow>
		<TableRow>
			<TextView android:text="@string/labCname" android:textSize="6pt"
				android:gravity="right" />
			<EditText android:id="@+id/txtCname" android:maxLength="50"
				android:singleLine="true"></EditText>
		</TableRow>
		<TableRow>
			<TextView android:text="@string/labData" android:textSize="6pt"
				android:gravity="right" />
			<EditText android:id="@+id/txtData" android:singleLine="true"></EditText>
		</TableRow>
		<TableRow>
			<TextView android:text="@string/labDisplay"
				android:textSize="6pt" android:gravity="right" />
			<EditText android:id="@+id/txtDisplay" android:singleLine="true"></EditText>
		</TableRow>
		<TableRow>
			<TextView android:text="@string/labRemark"
				android:textSize="6pt" android:gravity="right" />
			<EditText android:id="@+id/txtRemark" android:maxLines="4"></EditText>
		</TableRow>
	</TableLayout>
<!--	<LinearLayout android:orientation="horizontal"-->
<!--		android:gravity="center_horizontal" android:layout_width="fill_parent"-->
<!--		android:layout_height="wrap_content">-->
<!--		<Button android:id="@+id/btnSave" android:layout_width="110dp"-->
<!--			android:layout_height="45dp" android:layout_gravity="center_horizontal"-->
<!--			android:text="@string/btnSave" android:textStyle="bold"-->
<!--			android:textColor="@color/blue"></Button>-->
<!--		<Button android:id="@+id/btnClose" android:layout_width="110dp"-->
<!--			android:layout_gravity="center_horizontal" android:layout_height="45dp"-->
<!--			android:text="@string/btnClose" android:textStyle="bold"-->
<!--			android:textColor="@color/blue"></Button>-->
<!--	</LinearLayout>-->
</LinearLayout>
OK,就是这个界面,table布局。
再往下看,就是这个setIcon(设置弹出页图标),setTitle(弹出页标题),setPostiveButton和setNegativeButton。大家都知道弹出页在点击按钮的时候总是会自动关闭掉,为了解决这一问题,我们的按钮点击事件进行了重写
dialog.getButton(AlertDialog.BUTTON_POSITIVE)
							.setOnClickListener(new View.OnClickListener() {
								@Override
								public void onClick(View v) {}}
在点击事件中,如果说验证没通过,界面不会关闭,否则关闭。我们来看一下效果,界面并没有关闭。
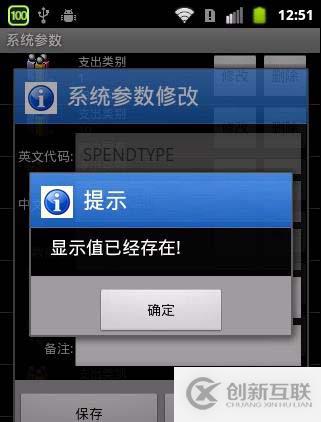
如果保存成功,则关闭界面

OK,我们接下来看看修改的调用
private SoapObject ModifySystemCode(String ename, String data,
			String display, String remark) {
		SoapObject request = new SoapObject(NAMESPACE, METHOD_NAME_PUT);
		SystemCodeEntity codeEntity = new SystemCodeEntity();
		codeEntity.setProperty(0, ename);
		codeEntity.setProperty(2, data);
		codeEntity.setProperty(3, display);
		codeEntity.setProperty(4, remark);

		PropertyInfo pi = new PropertyInfo();
		pi.setName("systemCodeEntity");
		pi.setValue(codeEntity);
		pi.setType(codeEntity.getClass());
		request.addProperty(pi);

		SoapSerializationEnvelope soapEnvelope = new SoapSerializationEnvelope(
				SoapEnvelope.VER11);
		soapEnvelope.dotNet = true;
		soapEnvelope.setOutputSoapObject(request);
		HttpTransportSE httpTS = new HttpTransportSE(URL);
		soapEnvelope.bodyOut = httpTS;
		soapEnvelope.setOutputSoapObject(request);// 设置请求参数
		soapEnvelope.addMapping(NAMESPACE, "SystemCodeEntity", codeEntity
				.getClass());

		try {
			httpTS.call(SOAP_ACTION_PUT, soapEnvelope);
		} catch (IOException e) {
			// TODO Auto-generated catch block
			e.printStackTrace();
		} catch (XmlPullParserException e) {
			// TODO Auto-generated catch block
			e.printStackTrace();
		}

		SoapObject result = null;
		try {
			result = (SoapObject) soapEnvelope.getResponse();
		} catch (SoapFault e) {
			// TODO Auto-generated catch block
			e.printStackTrace();
		}

		return result;
	}
在这里就不多讲了。再看一下***的代码
private SoapObject DeleteSystemCode(String ename, String data) {
		SoapObject request = new SoapObject(NAMESPACE, METHOD_NAME_DELETE);
		PropertyInfo pi = new PropertyInfo();
		pi.setName("ename");
		pi.setType(String.class);
		pi.setValue(ename);
		request.addProperty(pi);

		pi = new PropertyInfo();
		pi.setName("data");
		pi.setType(String.class);
		pi.setValue(data);

		SoapSerializationEnvelope soapEnvelope = new SoapSerializationEnvelope(
				SoapEnvelope.VER11);
		soapEnvelope.dotNet = true;
		soapEnvelope.setOutputSoapObject(request);
		HttpTransportSE httpTS = new HttpTransportSE(URL);
		soapEnvelope.bodyOut = httpTS;
		soapEnvelope.setOutputSoapObject(request);// 设置请求参数

		try {
			httpTS.call(SOAP_ACTION_DELETE, soapEnvelope);
		} catch (IOException e) {
			// TODO Auto-generated catch block
			e.printStackTrace();
		} catch (XmlPullParserException e) {
			// TODO Auto-generated catch block
			e.printStackTrace();
		}

		SoapObject result = null;
		try {
			result = (SoapObject) soapEnvelope.getResponse();
		} catch (SoapFault e) {
			// TODO Auto-generated catch block
			e.printStackTrace();
		}

		return result;
	}
OK,本篇到此为止。
另外有需要云服务器可以了解下创新互联scvps.cn,海内外云服务器15元起步,三天无理由+7*72小时售后在线,公司持有idc许可证,提供“云服务器、裸金属服务器、高防服务器、香港服务器、美国服务器、虚拟主机、免备案服务器”等云主机租用服务以及企业上云的综合解决方案,具有“安全稳定、简单易用、服务可用性高、性价比高”等特点与优势,专为企业上云打造定制,能够满足用户丰富、多元化的应用场景需求。
新闻名称:Android切近实战(四)-创新互联
网页地址:https://www.cdcxhl.com/article42/didpec.html
成都网站建设公司_创新互联,为您提供微信小程序、服务器托管、网站内链、定制开发、网站设计、外贸网站建设
声明:本网站发布的内容(图片、视频和文字)以用户投稿、用户转载内容为主,如果涉及侵权请尽快告知,我们将会在第一时间删除。文章观点不代表本网站立场,如需处理请联系客服。电话:028-86922220;邮箱:631063699@qq.com。内容未经允许不得转载,或转载时需注明来源: 创新互联

- 品牌网站设计制作-是企业对外的名片和形象 2020-11-28
- 品牌网站设计对企业来说有什么意义 2021-10-27
- 成都企业品牌网站设计的常见布局方式 2023-03-25
- 品牌网站设计如何达到展示目的 2013-09-04
- 想要做好品牌网站设计的4个要点 2022-01-09
- 品牌网站设计的意义是什么,如何起到这种效果? 2022-09-30
- 怎样做成都品牌网站设计才有效果? 2016-12-27
- 网站制作专业公司更相符公司的成长请求 2022-06-04
- 高端品牌网站设计注重的五大要素 2022-08-23
- 品牌网站设计怎样做更加高端? 2022-11-15
- 品牌网站设计怎么发挥效果? 2022-08-10
- 品牌网站设计的四大原则 2022-12-12