spring使用<context:load-time-weaver/>实现静态代理所遇到的问题
本篇内容主要讲解“spring使用<context:load-time-weaver/>实现静态代理所遇到的问题”,感兴趣的朋友不妨来看看。本文介绍的方法操作简单快捷,实用性强。下面就让小编来带大家学习“spring使用<context:load-time-weaver/>实现静态代理所遇到的问题”吧!
创新互联公司是一家专业提供新疆企业网站建设,专注与网站设计、成都网站建设、H5开发、小程序制作等业务。10年已为新疆众多企业、政府机构等服务。创新互联专业网站建设公司优惠进行中。
第一步:
创建要实现静态的类,以及Advice增强类实现,内容如下:
需要静态代理的类:
public interface IITestBean {
    void test();
}
public class TestBean implements IITestBean {
@Override
public void test() {
System.out.println("test");
}
}Advice增强类:
@Aspect
public class AspectTest {

    @Pointcut("execution(* *.test(..))")
    public void test() {
        System.out.println("我切入了");
    }

    @Before("test()")
    public void beforeTest() {
        System.out.println("beforeTest()");
    }

    @After("test()")
    public void afterTest() {
        System.out.println("afterTest()");
    }

    @Around("test()")
    public Object aroundTest(ProceedingJoinPoint p) {
        System.out.println("before1");
        Object o = null;
        try {
            o = p.proceed();
        } catch (Throwable throwable) {
            throwable.printStackTrace();
        }
        System.out.println("after1");
        return o;
    }
}
第二步:
在class目录下的META-INF(没有则创建)文件夹下建立aop.xml,内容如下
<!DOCTYPE aspectj PUBLIC "-//AspectJ//DTD//EN" "http://www.eclipse.org/aspectj/dtd/aspectj.dtd">
<aspectj>
    <weaver>
        <include within="com.zzx.study.aspect.*"/>
    </weaver>

    <aspects>
        <aspect name="com.zzx.study.aspect.AspectTest"/>
    </aspects>
</aspectj>
第三步:
编写spring的配置spring-aspect.xml,内容如下:
<?xml version="1.0" encoding="UTF-8" ?>
<beans xmlns="http://www.springframework.org/schema/beans"
       xmlns:xsi="http://www.w3.org/2001/XMLSchema-instance"
       xmlns:aop="http://www.springframework.org/schema/aop"
       xmlns:context="http://www.springframework.org/schema/context"
       xsi:schemaLocation="http://www.springframework.org/schema/beans
            http://www.springframework.org/schema/beans/spring-beans.xsd
            http://www.springframework.org/schema/aop
            http://www.springframework.org/schema/aop/spring-aop-3.0.xsd
            http://www.springframework.org/schema/context
            http://www.springframework.org/schema/context/spring-context-3.0.xsd">

    <bean id="test" class="com.zzx.study.aspect.TestBean"/>
    <context:load-time-weaver/>
</beans>
第四步:
编写测试类,内容如下:
public class AspectTest {
    public static void main(String[] args) {
        ApplicationContext context = new ClassPathXmlApplicationContext("spring-aspect.xml");
        TestBean bean = (TestBean)context.getBean("test");
        bean.test();
    }
}
第五步:
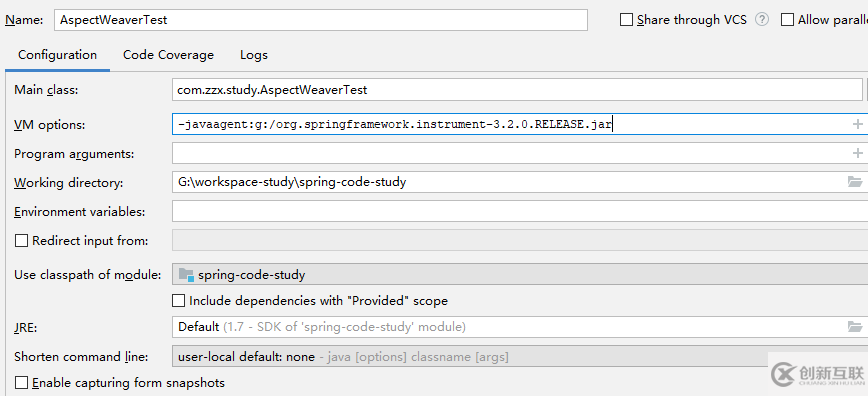
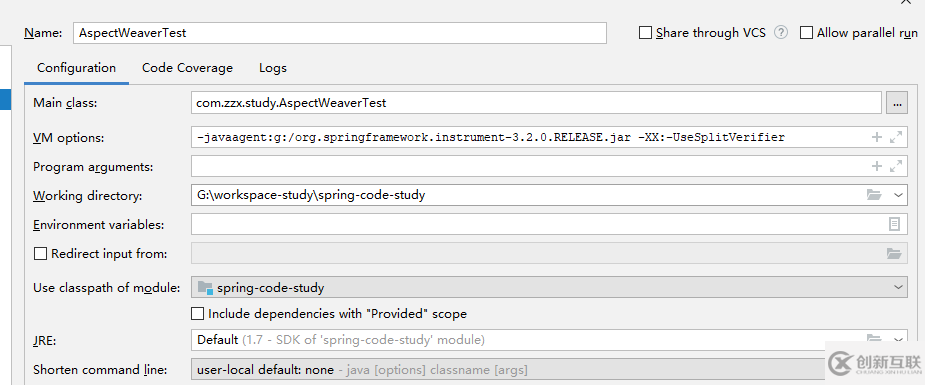
测试时,需下载并引入org.springframework.instrument.jar文件,在idea中配置如下:

第六步:
运行中遇到的问题
问题1:出现了一个java.lang.VerifyError: Expecting a stackmap frame at branch target 7错误
解决方法:idea中VM option,需加入-XX:-UseSplitVerifier

问题2:circular advice precedence错误
解决方法:
原因Advice增强器AspectTest,必须要按照@Before->@Around->@After编写代码,上面代码调整顺利即可。但是在spring动态代理没有该顺序不对,不会抛异常。
第七步:
我们可以看到正常的静态类代理结果如下:

到此,相信大家对“spring使用<context:load-time-weaver/>实现静态代理所遇到的问题”有了更深的了解,不妨来实际操作一番吧!这里是创新互联网站,更多相关内容可以进入相关频道进行查询,关注我们,继续学习!
当前标题:spring使用<context:load-time-weaver/>实现静态代理所遇到的问题
网站路径:https://www.cdcxhl.com/article32/jocppc.html
成都网站建设公司_创新互联,为您提供软件开发、定制网站、移动网站建设、虚拟主机、全网营销推广、网站制作
声明:本网站发布的内容(图片、视频和文字)以用户投稿、用户转载内容为主,如果涉及侵权请尽快告知,我们将会在第一时间删除。文章观点不代表本网站立场,如需处理请联系客服。电话:028-86922220;邮箱:631063699@qq.com。内容未经允许不得转载,或转载时需注明来源: 创新互联

- 企业建站需要的空间和资金 2014-02-06
- 手机网站成为企业建站标配 2016-11-10
- 企业建站要怎么选择关键词 2017-08-10
- 扬州企业建站:制作网站必须要满足这些需求! 2021-12-25
- 成都做网站公司企业建站应该明确哪些问题 2018-07-08
- 企业建站如何准备网站建设资料 2022-10-31
- 企业建站流程大揭秘 2016-10-07
- 企业建站要怎么选择关键词? 2022-05-22
- 让你建站不用愁-认知企业建站 2021-06-15
- 企业建站如何选择正确关键词 2016-08-02
- 网站建设推广效果;要明确企业建站目的 2021-08-01
- 企业建站时需要注意哪些方面的问题? 2022-05-25