使用TextInputLayout分分钟构造一个酷炫登录框架-创新互联
Google在2015的IO大会上,给我们带来了更加详细的Material Design设计规范,同时,也给我们带来了全新的Android Design Support Library,Android Design Support Library的兼容性更广,直接可以向下兼容到Android 2.2

下面我们用TextInputLayout构造一个酷炫的登录框架
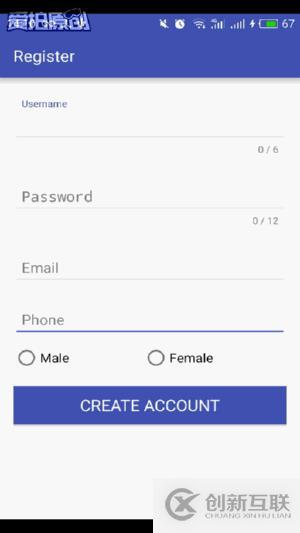
先上效果图:
要使用Design Support Library现在gradle中加入
compile 'com.android.support:design:23.4.0'
登录页面的布局:
<?xml version="1.0" encoding="utf-8"?>
<LinearLayout xmlns:android="http://schemas.android.com/apk/res/android"
    xmlns:tools="http://schemas.android.com/tools"
    android:layout_width="match_parent"
    android:layout_height="match_parent"
    android:orientation="vertical"
    android:paddingBottom="@dimen/activity_vertical_margin"
    android:paddingLeft="@dimen/activity_horizontal_margin"
    android:paddingRight="@dimen/activity_horizontal_margin"
    android:paddingTop="@dimen/activity_vertical_margin"
    tools:context="com.lg.logindemo.MainActivity">

    <TextView
        android:layout_width="match_parent"
        android:layout_height="200dp"
        android:gravity="center"
        android:text="Welcome"
        android:textColor="@color/colorPrimary"
        android:textSize="30dp" />

    <android.support.design.widget.TextInputLayout
        android:layout_width="match_parent"
        android:layout_height="wrap_content"
        android:layout_marginTop="10dp">

        <EditText
            android:layout_width="match_parent"
            android:layout_height="wrap_content"
            android:hint="Username"
            android:paddingLeft="10dp"
            android:paddingRight="10dp"
            android:singleLine="true" />
    </android.support.design.widget.TextInputLayout>

    <android.support.design.widget.TextInputLayout
        android:layout_width="match_parent"
        android:layout_height="wrap_content"
        android:layout_marginTop="10dp">

        <EditText
            android:layout_width="match_parent"
            android:layout_height="wrap_content"
            android:hint="Password"
            android:inputType="textPassword"
            android:paddingLeft="10dp"
            android:paddingRight="10dp"
            android:singleLine="true" />
    </android.support.design.widget.TextInputLayout>

    <android.support.v7.widget.AppCompatButton
        android:id="@+id/login"
        android:layout_width="match_parent"
        android:layout_height="wrap_content"
        android:layout_marginTop="20dp"
        android:background="@color/colorPrimary"
        android:onClick="onLogin"
        android:text="LOGIN"
        android:textColor="@android:color/white"
        android:textSize="20sp"
        android:textStyle="bold" />

    <TextView
        android:layout_width="match_parent"
        android:layout_height="wrap_content"
        android:layout_marginTop="10dp"
        android:gravity="center"
        android:onClick="register"
        android:text="No account yet?Create one"
        android:textSize="16sp"
        android:textStyle="bold" />
</LinearLayout>
TextInputLayout 继承于LinearLayout也是一个布局,要配合它的子控件来显示出想要的效果,这里谷歌把它专门设计用来包裹EditText(或者EditText的子类),然后当用户进行输入动作的时候我们设置的android:hint 提示就会以动画的形式运动到左上角
public class MainActivity extends AppCompatActivity {
    private Button button;

    @Override
    protected void onCreate(Bundle savedInstanceState) {
        super.onCreate(savedInstanceState);
        setContentView(R.layout.activity_main);
        setTitle("Login");
        button=(Button)findViewById(R.id.login);
        button.setOnClickListener(new View.OnClickListener() {
            @Override
            public void onClick(View v) {
                Toast.makeText(MainActivity.this,"Login Successful",Toast.LENGTH_SHORT).show();
            }
        });
    }

    //注册
    public void register(View view){
        startActivity(new Intent(this,RegisterAcitvity.class));
    }
}
很简单,只是为了画个框架,可以根据需求自己完善
下面是注册页面的布局:
<?xml version="1.0" encoding="utf-8"?>
<LinearLayout xmlns:android="http://schemas.android.com/apk/res/android"
    xmlns:app="http://schemas.android.com/apk/res-auto"
    xmlns:tools="http://schemas.android.com/tools"
    android:layout_width="match_parent"
    android:layout_height="match_parent"
    android:orientation="vertical"
    android:paddingBottom="@dimen/activity_vertical_margin"
    android:paddingLeft="@dimen/activity_horizontal_margin"
    android:paddingRight="@dimen/activity_horizontal_margin"
    android:paddingTop="@dimen/activity_vertical_margin"
    tools:context="com.lg.logindemo.RegisterAcitvity">

    <android.support.design.widget.TextInputLayout
        android:layout_width="match_parent"
        android:layout_height="wrap_content"
        app:counterEnabled="true"
        app:counterMaxLength="6"
        app:counterOverflowTextAppearance="@style/ErrorStyle"
        android:layout_marginTop="10dp"
        >

        <EditText
            android:layout_width="match_parent"
            android:layout_height="wrap_content"
            android:hint="Username"
            android:paddingLeft="10dp"
            android:paddingRight="10dp"
            android:singleLine="true" />
    </android.support.design.widget.TextInputLayout>

    <android.support.design.widget.TextInputLayout
        android:layout_width="match_parent"
        android:layout_height="wrap_content"
        app:counterEnabled="true"
        app:counterMaxLength="12"
        app:counterOverflowTextAppearance="@style/ErrorStyle"
        android:layout_marginTop="10dp">

        <EditText
            android:layout_width="match_parent"
            android:layout_height="wrap_content"
            android:hint="Password"
            android:inputType="textPassword"
            android:paddingLeft="10dp"
            android:paddingRight="10dp"
            android:singleLine="true" />
    </android.support.design.widget.TextInputLayout>

    <android.support.design.widget.TextInputLayout
        android:layout_width="match_parent"
        android:layout_height="wrap_content"
        android:layout_marginTop="10dp">

        <EditText
            android:layout_width="match_parent"
            android:layout_height="wrap_content"
            android:hint="Email"
            android:inputType="textEmailAddress"
            android:paddingLeft="10dp"
            android:paddingRight="10dp"
            android:singleLine="true" />
    </android.support.design.widget.TextInputLayout>

    <android.support.design.widget.TextInputLayout
        android:layout_width="match_parent"
        android:layout_height="wrap_content"
        android:layout_marginTop="10dp">

        <EditText
            android:layout_width="match_parent"
            android:layout_height="wrap_content"
            android:hint="Phone"
            android:inputType="phone"
            android:paddingLeft="10dp"
            android:paddingRight="10dp"
            android:singleLine="true" />
    </android.support.design.widget.TextInputLayout>

    <RadioGroup
        android:layout_width="match_parent"
        android:layout_height="wrap_content"
        android:layout_marginTop="10dp"
        android:orientation="horizontal">

        <android.support.v7.widget.AppCompatRadioButton
            android:layout_width="wrap_content"
            android:layout_height="wrap_content"
            android:layout_weight="1"
            android:text="Male"
            android:textSize="16sp" />

        <android.support.v7.widget.AppCompatRadioButton
            android:layout_width="wrap_content"
            android:layout_height="wrap_content"
            android:layout_weight="1"
            android:text="Female"
            android:textSize="16sp" />
    </RadioGroup>

    <android.support.v7.widget.AppCompatButton
        android:id="@+id/register"
        android:layout_width="match_parent"
        android:layout_height="wrap_content"
        android:layout_marginTop="20dp"
        android:background="@color/colorPrimary"
        android:text="CREATE ACCOUNT"
        android:textColor="@android:color/white"
        android:textSize="20sp" />
</LinearLayout>
android:singleLine="true"属性设置单行显示
设置app:counterEnabled="true" 打开Edittext右下角字数统计,app:counterMaxLength="6"设置它的长度
但要谨记,使用这个功能的时候必须加上 app:counterOverflowTextAppearance属性,不然程序很报错
自定义ErrorStyle样式:
<style name="ErrorStyle">
     <item name="android:textColor">@color/colorAccent</item>
</style>
当然,如果想要修改Edittext框的选中颜色可以修改AppTheme中的colorAccent属性
<style name="AppTheme" parent="Theme.AppCompat.Light.DarkActionBar">
        <!-- Customize your theme here. -->
        <item name="colorPrimary">@color/colorPrimary</item>
        <item name="colorPrimaryDark">@color/colorPrimaryDark</item>
        <item name="colorAccent">@color/colorPrimary</item>
</style>
源码地址:http://down.51cto.com/data/2222023
另外有需要云服务器可以了解下创新互联scvps.cn,海内外云服务器15元起步,三天无理由+7*72小时售后在线,公司持有idc许可证,提供“云服务器、裸金属服务器、高防服务器、香港服务器、美国服务器、虚拟主机、免备案服务器”等云主机租用服务以及企业上云的综合解决方案,具有“安全稳定、简单易用、服务可用性高、性价比高”等特点与优势,专为企业上云打造定制,能够满足用户丰富、多元化的应用场景需求。
网页标题:使用TextInputLayout分分钟构造一个酷炫登录框架-创新互联
本文来源:https://www.cdcxhl.com/article32/gsssc.html
成都网站建设公司_创新互联,为您提供建站公司、域名注册、用户体验、网站改版、外贸建站、网站建设
声明:本网站发布的内容(图片、视频和文字)以用户投稿、用户转载内容为主,如果涉及侵权请尽快告知,我们将会在第一时间删除。文章观点不代表本网站立场,如需处理请联系客服。电话:028-86922220;邮箱:631063699@qq.com。内容未经允许不得转载,或转载时需注明来源: 创新互联

- 新闻动态网站系统中数据库安全的重要性 2022-01-06
- 静态路径和动态路径有何区别,如何进行SEO优化? 2016-10-29
- 网站建设中的静态页面与动态网页哪个更好? 2016-06-18
- 企业网站建设中所说的静态网站和动态网站有什么区别? 2021-05-29
- 分析动态网站和静态网站的区别 2016-12-04
- 企业建设网站页面是使用动态好还是静态好呢 2016-09-25
- 动态网页静态化的优点 2016-11-04
- “对话”、“画外音”,对网站的动态效果有何影响? 2016-11-18
- 网站SEO静态页面比动态页面好优化? 2013-12-04
- 动态网页的工作方式 2016-11-09
- html5网站建设 轻松搭建动态网站 2015-09-14
- 动态网站的搜索引擎优化 2023-01-15