Springboot中怎么整合Activemq-创新互联
Springboot中怎么整合Activemq,很多新手对此不是很清楚,为了帮助大家解决这个难题,下面小编将为大家详细讲解,有这方面需求的人可以来学习下,希望你能有所收获。
1 导入整合所需要的依赖:
<dependency>
      <groupId>org.springframework.boot</groupId>
      <artifactId>spring-boot-starter-activemq</artifactId>
    </dependency>
2 创建application.properties文件
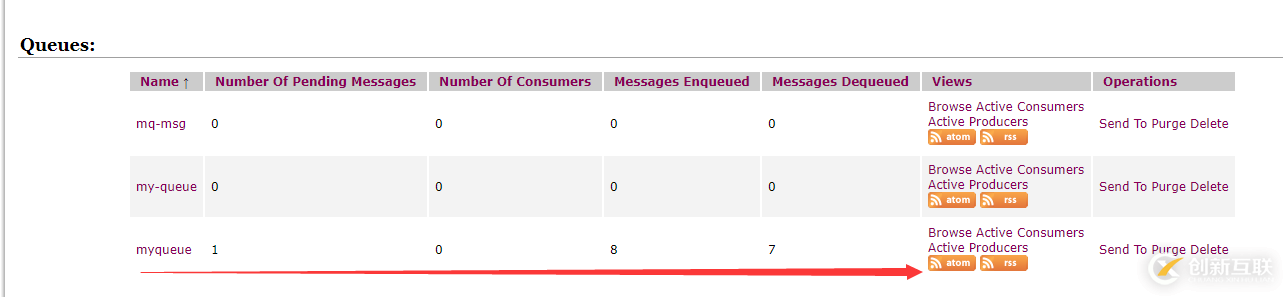
spring.activemq.broker-url=tcp://127.0.0.1:61616
spring.activemq.user=admin
spring.activemq.password=admin
server.port=8080
queue=myqueue
3.自定义配置文件QueueConfig 读取配置文件的队列名,根据队列名字创建一个Queue
package com.example.demo;

import javax.jms.Queue;

import org.apache.activemq.ActiveMQConnectionFactory;
import org.apache.activemq.command.ActiveMQQueue;
import org.springframework.beans.factory.annotation.Value;
import org.springframework.context.annotation.Bean;
import org.springframework.context.annotation.Configuration;
import org.springframework.jms.config.DefaultJmsListenerContainerFactory;
import org.springframework.jms.core.JmsTemplate;

@Configuration
public class QueueConfig {

  @Value("${queue}")
  private String queue;

  @Bean
  public Queue logQueue() {
    return new ActiveMQQueue(queue);
  }}
4.创建生产者,可以直接使用提供的模板JmsMessagingTemplate 进行消息的发送:
package com.example.demo.producter;
import javax.jms.Queue;
import org.slf4j.Logger;
import org.slf4j.LoggerFactory;
import org.springframework.beans.factory.annotation.Autowired;
import org.springframework.jms.core.JmsMessagingTemplate;
import org.springframework.stereotype.Component;
import com.example.demo.SpringbootActivemqApplication;
@Component
public class Producter {
@Autowired
private JmsMessagingTemplate jmsMessagingTemplate;
@Autowired
private Queue queue;
private static Logger logger = LoggerFactory.getLogger(
Producter
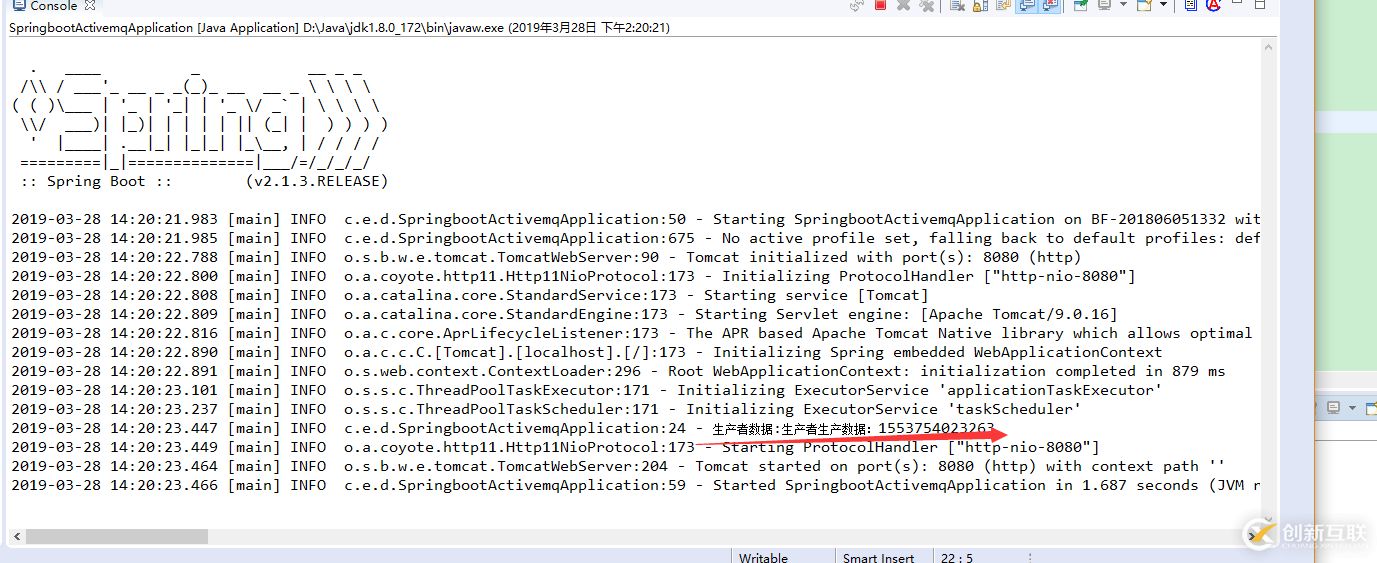
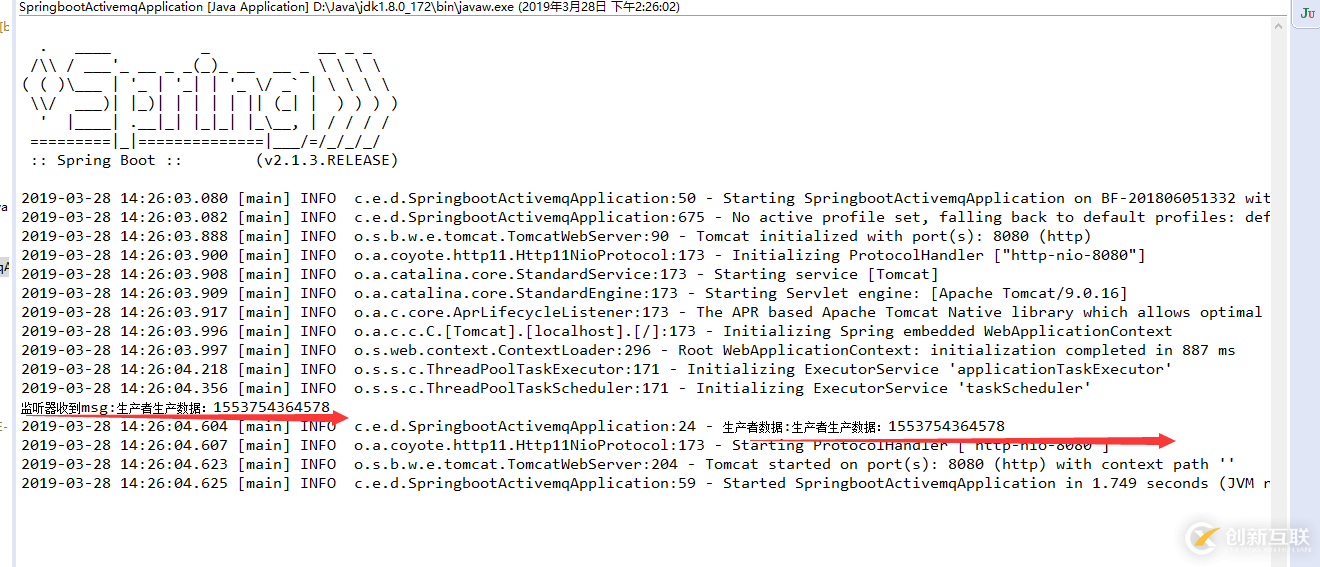
.class); public void send() { String str = "生产者生产数据:" + System.currentTimeMillis(); jmsMessagingTemplate.convertAndSend(queue, str); logger.info("生产者数据:{}", str); } }5.启动类:
package com.example.demo;

import org.springframework.beans.factory.annotation.Autowired;
import org.springframework.boot.SpringApplication;
import org.springframework.boot.autoconfigure.SpringBootApplication;
import org.springframework.context.ApplicationListener;
import org.springframework.context.event.ContextRefreshedEvent;
import org.springframework.scheduling.annotation.EnableScheduling;

import com.example.demo.producter.Producter;
import com.example.demo.producter.consumer.Consumer;

@SpringBootApplication
@EnableScheduling
public class SpringbootActivemqApplication implements ApplicationListener<ContextRefreshedEvent> {
  @Autowired
  public Producter producter;
  @Autowired
  public Consumer consumer;

  public static void main(String[] args) {
    SpringApplication.run(SpringbootActivemqApplication.class, args);
    //onApplicationEvent方法 在启动springboot的时候 会运行该方法,可根据项目实际情况 选择合适调用消息发送方法

  }

  @Override
  public void onApplicationEvent(ContextRefreshedEvent event) {
    producter.send();
  }

}
6.启动项目,控制台输出内容:
7.创建消费者,创建消费者比较容易,只需要监听队列就可以:
package com.example.demo.producter.consumer;

import org.springframework.jms.annotation.JmsListener;
import org.springframework.stereotype.Component;

@Component
public class Consumer {

  @JmsListener(destination = "${queue}")
  public void receive(String msg) {
    System.out.println("监听器收到msg:" + msg);
  }

}
8.最后结果:
看完上述内容是否对您有帮助呢?如果还想对相关知识有进一步的了解或阅读更多相关文章,请关注创新互联网站建设公司行业资讯频道,感谢您对创新互联建站的支持。
另外有需要云服务器可以了解下创新互联建站www.cdcxhl.com,海内外云服务器15元起步,三天无理由+7*72小时售后在线,公司持有idc许可证,提供“云服务器、裸金属服务器、建站服务器、香港服务器、美国服务器、虚拟主机、免备案服务器”等云主机租用服务以及企业上云的综合解决方案,具有“安全稳定、简单易用、服务可用性高、性价比高”等特点与优势,专为企业上云打造定制,能够满足用户丰富、多元化的应用场景需求。
标题名称:Springboot中怎么整合Activemq-创新互联
URL标题:https://www.cdcxhl.com/article26/dosccg.html
成都网站建设公司_创新互联,为您提供外贸网站建设、外贸建站、手机网站建设、品牌网站建设、动态网站、网站导航
声明:本网站发布的内容(图片、视频和文字)以用户投稿、用户转载内容为主,如果涉及侵权请尽快告知,我们将会在第一时间删除。文章观点不代表本网站立场,如需处理请联系客服。电话:028-86922220;邮箱:631063699@qq.com。内容未经允许不得转载,或转载时需注明来源: 创新互联

- 建立定制网站的四个基本原则 2016-10-26
- 定制网站不仅限于设计还包括功能栏目及定位体验等诸多方面 2022-05-24
- 免费网站、模板网站和定制网站有什么区别? 2021-06-07
- 定制网站建设的基本原则 2021-05-02
- 企业建站是选择定制网站还是模板建站呢 2016-10-11
- 需要高端网站定制设计,定制网站需要多少钱? 2022-08-24
- 创新互联如何设计制作企业定制网站 2013-05-03
- 定制网站的优势提高客户转化率 2016-10-17
- 上海嘉定网站制作:模板与定制网站区别在哪里? 2020-12-04
- 建设网站为什么优先选择定制网站而不是模板建站呢 2021-09-15
- 模板网站与定制网站有何区别,企业该选择哪种 2015-01-07
- 定制网站和模板网站建设该如何选择,一分析就透! 2020-11-25