Vue2.x通用编辑组件如何封装及应用
这篇文章主要介绍了Vue2.x通用编辑组件如何封装及应用,具有一定借鉴价值,感兴趣的朋友可以参考下,希望大家阅读完这篇文章之后大有收获,下面让小编带着大家一起了解一下。
山亭网站建设公司成都创新互联公司,山亭网站设计制作,有大型网站制作公司丰富经验。已为山亭近千家提供企业网站建设服务。企业网站搭建\成都外贸网站建设要多少钱,请找那个售后服务好的山亭做网站的公司定做!
具体内容如下
效果
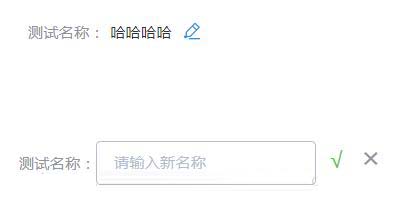
组件源码
<template>
 <div class="edit-input">
 <div class="editBox">
  <div>
  <span class="list">{{ name }}:</span>
  <span class="listValue" v-if="!editStatus">{{value}}</span>
  </div>
  <span class="editLogo iconfont icon-Edit" @click="editStatus = !editStatus" v-if="!editStatus"></span>
  <div class="edit" v-if="editStatus">
  <el-input v-model="newValue" :placeholder="placeholderDes"></el-input>
  <span class="confirmEdit" @click="changeValue">√</span>
  <span class="cancel" @click="editStatus = !editStatus">×</span>
  </div>
 </div>
 </div>
</template>

<script>
import '@/common/font/iconfont.css'
export default {
 props: {
 name: {
  type: String,
  require: true
 },
 value: {
  type: String,
  require: true
 },
 placeholderDes: {
  type: String,
  default: ''
 }
 },
 data () {
 return {
  newValue: '',
  editStatus: false
 }
 },
 methods: {
 changeValue () {
  this.$emit('valueChange', this.newValue)
  this.editStatus = false
 }
 }
}
</script>

<style lang="less" scoped>
.edit-input {
 .editBox {
 display: flex;
 margin-top: 10px;
 text-align: center;
 .list {
  color: #909399;
  font-size: 14px;
  line-height: 40px;
  display: inline-block;
  }
  .listValue {
  color: #303133;
  font-size: 14px;
  line-height: 26px;
  }
 .editLogo {
  color: #2695E4;
  padding-top: 12px;
  padding-left: 10px;
 }
 .edit{
  height: 50px;
  width: 260px;
  .confirmEdit {
  margin-left: 4px;
  width: 20px;
  height: 36px;
  display: inline-block;
  color: #67c23a;
  font-size: 20px;
  cursor: pointer;
  }
  .cancel {
  color: #929398;
  font-size: 20px;
  margin-left: 6px;
  cursor: pointer;
  width: 20px;
  height: 36px;
  display: inline-block;
  font-size: 26px;
  &:hover {
   color: #fa5555;
  }
  }
  .el-input {
  width: 200px;
  }
 }
 }
}
</style>
父组件中引用
<template>
 <div class="test">
 <v-edit-input placeholderDes="请输入新名称" name="测试名称" value="哈哈哈哈" @valueChange="changeValue"></v-edit-input>
 </div>
</template>

<script>
import VEditInput from '@/components/Common/EditInput'
export default {
 components: {
 VEditInput
 },
 methods: {
 changeValue (newVal) {
  // newVal即为修改后的新值,接下来用来与后端交互即可。
 }
 }
}
</script>注:组件源码中import'@/common/font/iconfont.css'目的是为了引入编辑图标,图标使用于iconfont官网使用svg制作,实际应用时请删除此行代码,改为你自己的图标,即给.editLogo加个背景图即可。
感谢你能够认真阅读完这篇文章,希望小编分享的“Vue2.x通用编辑组件如何封装及应用”这篇文章对大家有帮助,同时也希望大家多多支持创新互联,关注创新互联行业资讯频道,更多相关知识等着你来学习!
本文标题:Vue2.x通用编辑组件如何封装及应用
网站地址:https://www.cdcxhl.com/article12/jghedc.html
成都网站建设公司_创新互联,为您提供网站营销、电子商务、做网站、云服务器、网站收录、定制开发
声明:本网站发布的内容(图片、视频和文字)以用户投稿、用户转载内容为主,如果涉及侵权请尽快告知,我们将会在第一时间删除。文章观点不代表本网站立场,如需处理请联系客服。电话:028-86922220;邮箱:631063699@qq.com。内容未经允许不得转载,或转载时需注明来源: 创新互联

- 微信小程序制作,软件小程序开发哪家好? 2022-11-23
- 从0到1,微信小程序开发的11步 2022-07-08
- 成都小程序开发哪家好 2014-04-12
- 发布任务小程序开发中各个终端功能该如何策划 2023-03-20
- 微信小程序开发 2021-02-23
- 永安驾考小程序开发应具备哪些功能? 2020-12-12
- 为什么选择做餐饮小程序的商家这么多? 2014-01-07
- 微信小程序开发时要留意什么事宜 2021-11-12
- 微信小程序推广方法 2016-10-05
- 微信小程序开发三个注意点 2020-11-24
- 成都网站建设网络推广小程序开发公司 2022-12-09
- 微信小程序开发者必知:小程序+ssl证书=安全通过 2022-11-16